Microsoft is about to end the support of Windows 10 on October 14, 2025, and with millions of gaming PCs not supporting TPM 2.0, gamers will have two choices: Either upgrade to Windows 11 and risk their devices and security, or install a gaming Linux distro and end their problems once and for all.
After years of waiting, Microsoft finally gave PC owners the chance to upgrade their old and unsupported hardware to Windows 11, but with a catch: They may experience critical issues, they’ll not get any support whatsoever, and their security is on their own hands. That’s bad, and it’s not ideal in any case. So what alternatives do gamers currently have? Change their operating system with a gaming Linux distro that will provide them with all they need for years to come.
I’ve been using Linux for over 16 years now, and although the operating system wasn’t ideal for gaming, nowadays you can play almost any game that you’d play in Windows. Whether it’s from Steam, Epic Games Store, Rockstar Games Launcher, Ubisoft, or from almost any other game launcher, Linux can now run Windows gamers easier than ever before – and yes, even the newest AAA titles.
It’s a great choice for those wanting to retain their security, privacy, performance, and gaming experience without having to upgrade to Windows 11 and lose their sanity.
In this beginner’s guide, I’ll show you step-by-step how to download, install, and configure any Linux distro, and how to play all of your favorite games with ease – even if you have a decade-old desktop PC or laptop.
1. Choose a gaming Linux distro
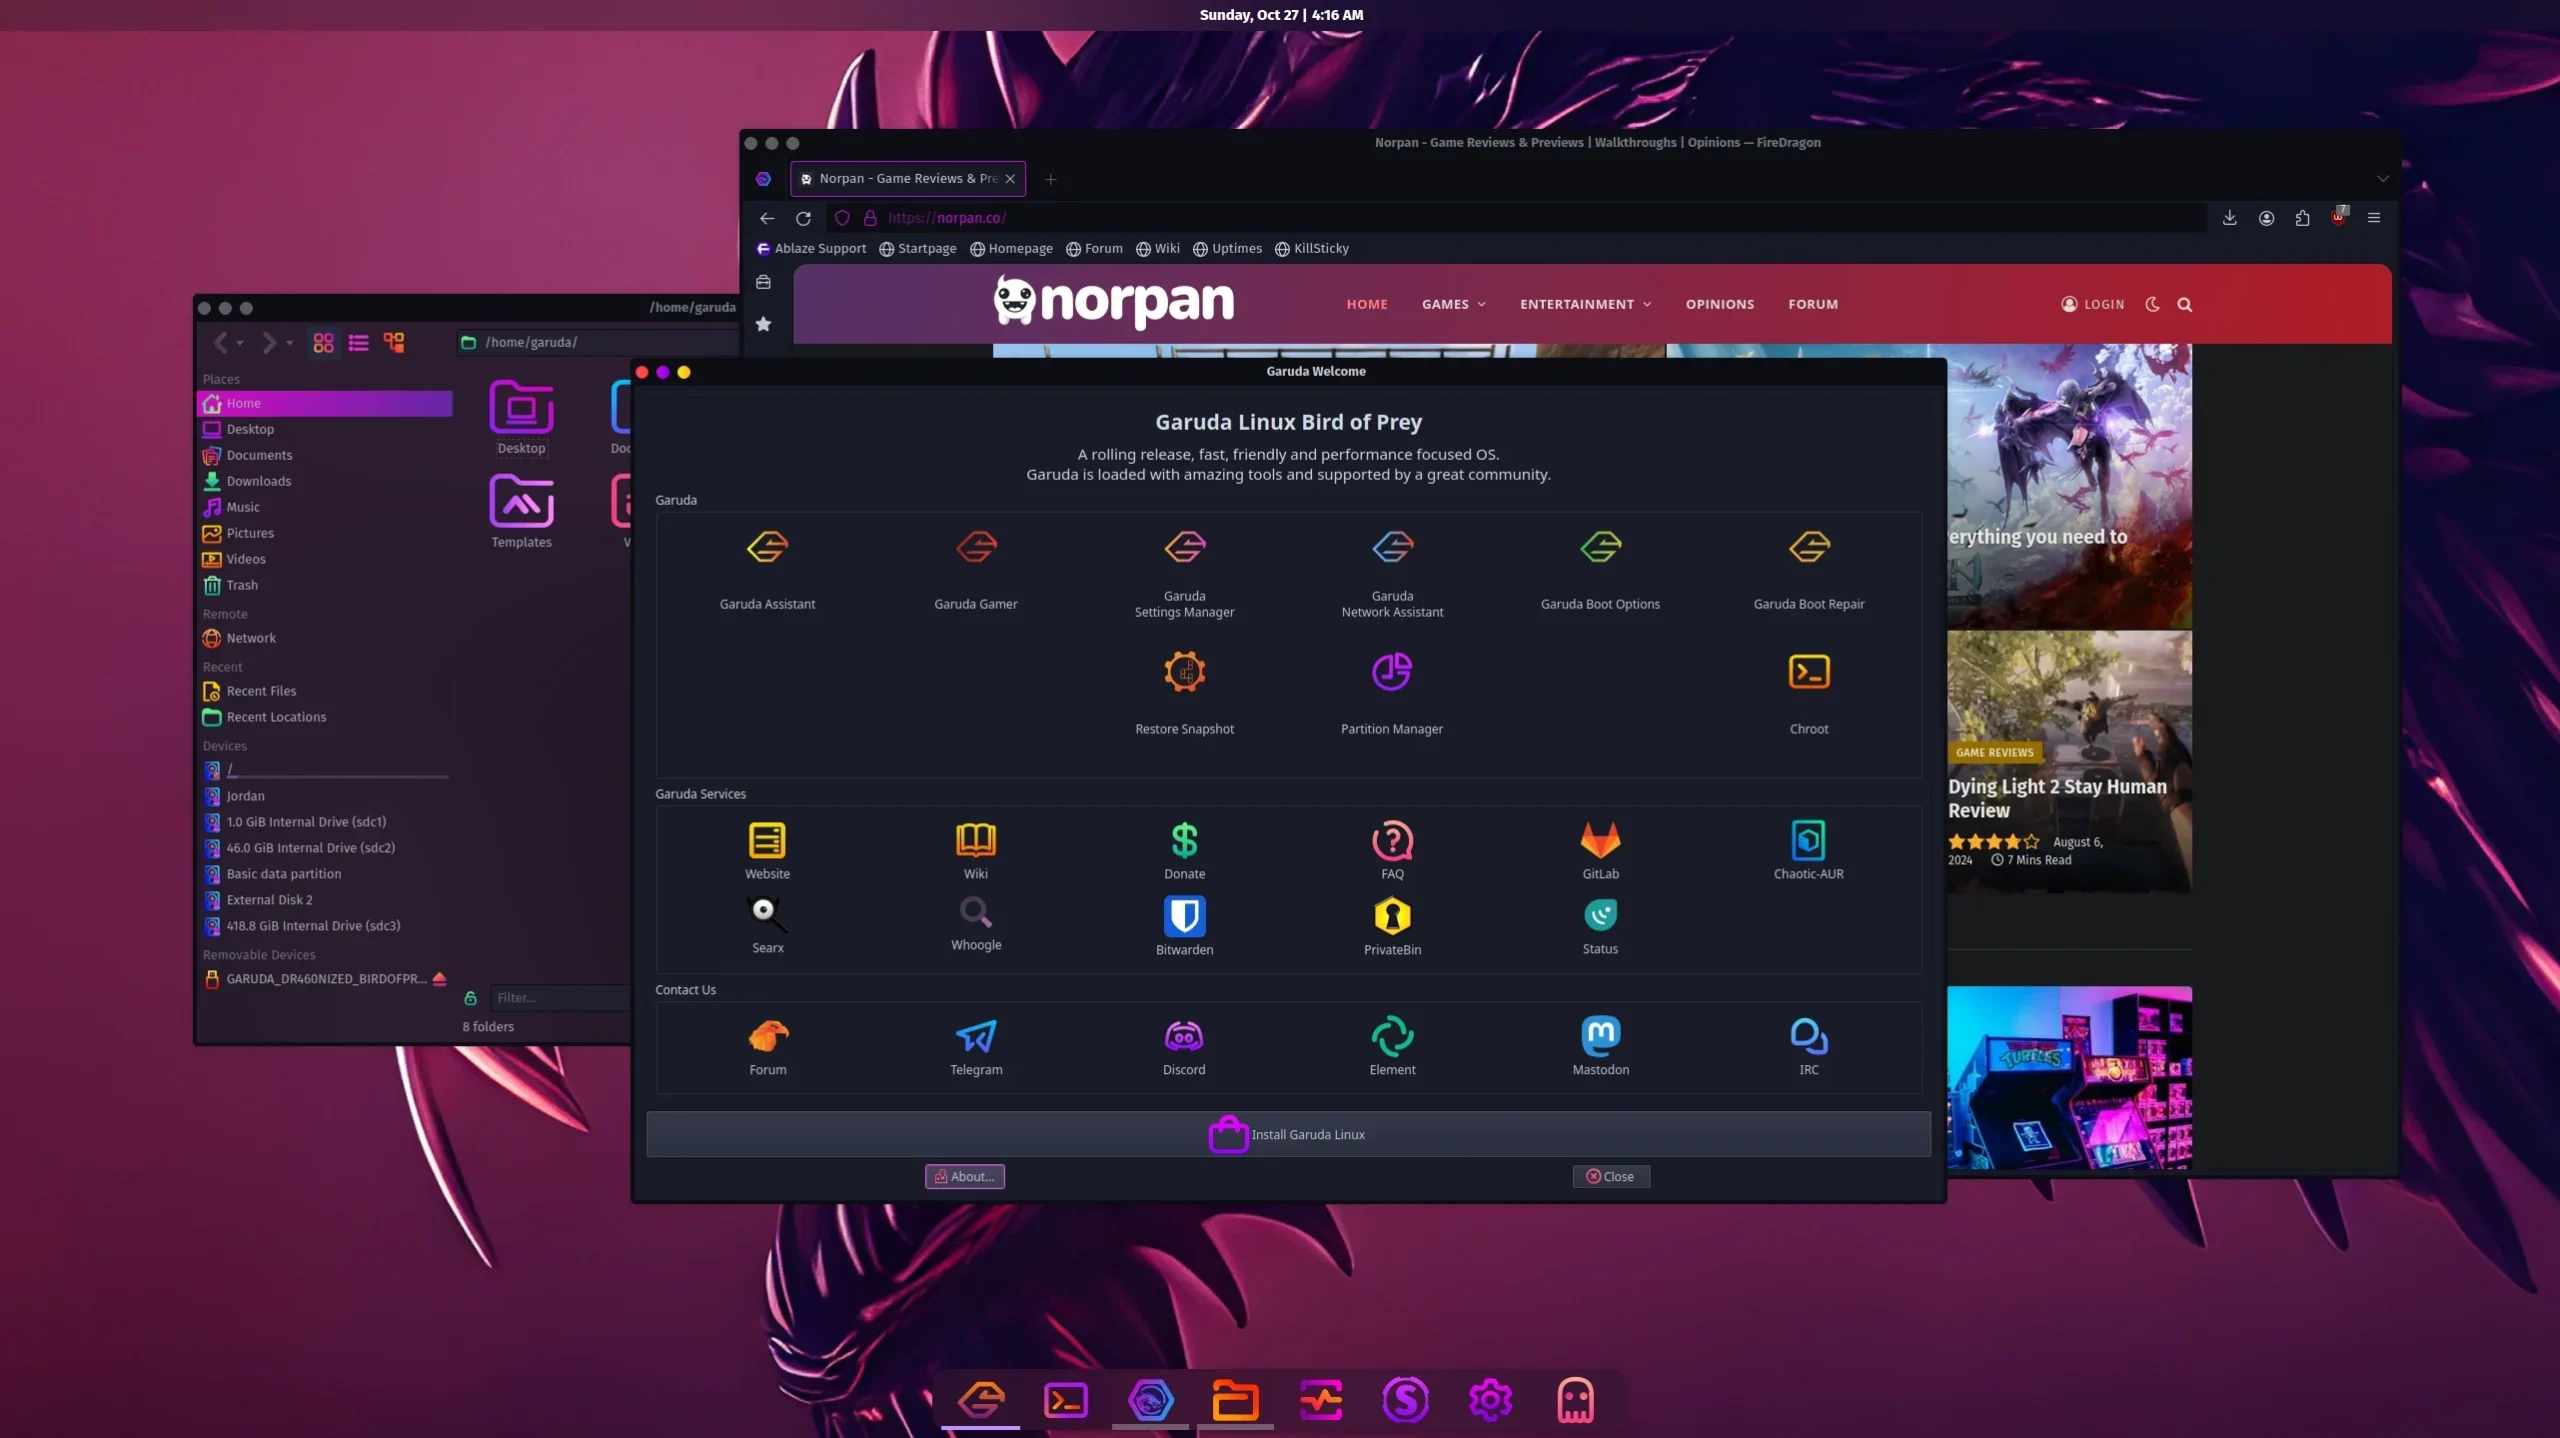
Although you can play all your favorite games on any Linux distro, choosing a gaming-focused one is the most preferred way, especially if this is the first time installing and using the operating system. Gaming distros tend to come with lots of pre-installed things that you’ll need to have a smoother and improved gaming experience, including all the necessary drivers for your graphics card.
I have already mentioned six of the best gaming Linux distros that you can use with ease, so make sure to check them all out:
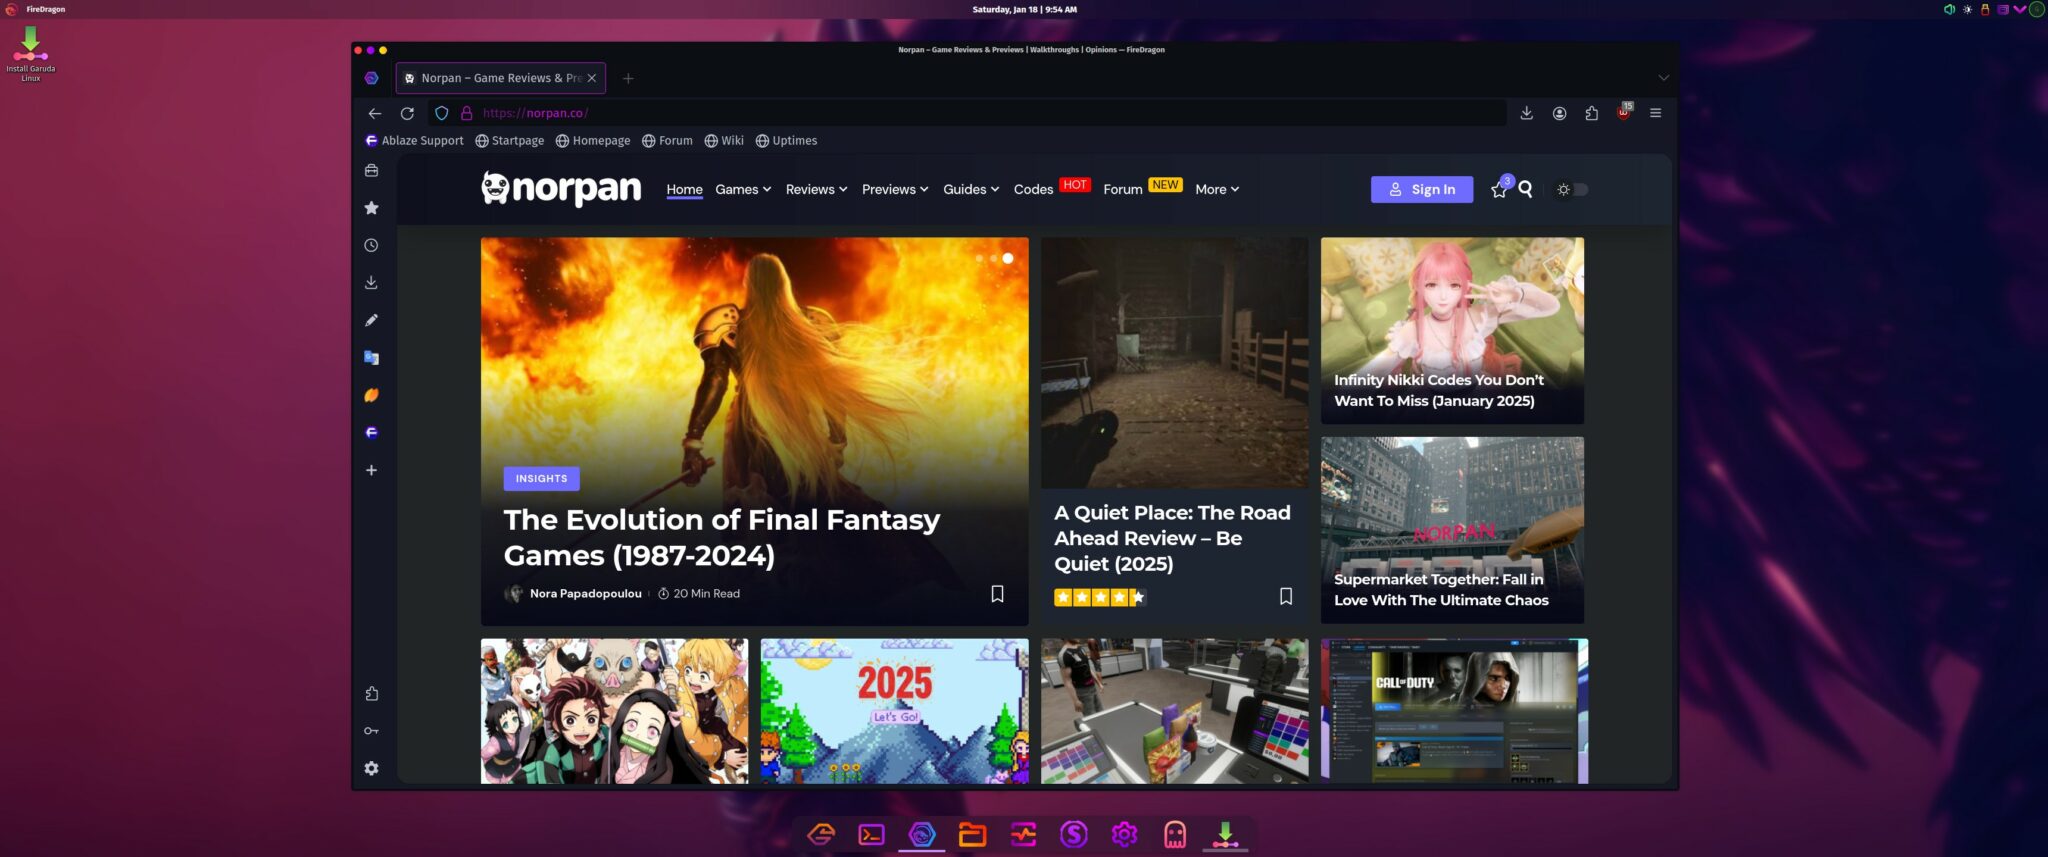
For this tutorial, we’ll be using Garuda Linux, which is one of the best gaming distros, and a very easy one to install, set up, and start playing within minutes. Pop_Os! is another great option too, and a very popular one too.
Now, Garuda Linux comes in many flavors, including KDE, Gnome, XFCE, Cinnamon, Sway, i3WM, Hyprland, and KDE lite. If you want a beautiful, modern, and stable version, I’d suggest you stay with KDE Plasma, which is Garuda’s main graphical environment – but not the fastest one. If you have an older PC that is not that powerful or you’re looking for the best performance, go with XFCE.
There’s also the Garuda Linux KDE Lite, which is made for those who don’t want anything extra installed in their operating system. It’s a bloat-free option that contains only the bare minimum of packages needed to get started. Unfortunately, though, Garuda “does not provide any support for the Lite editions,” so make sure you know what you’re doing if you go with this option.
If you want to find more Linux distros, you can always visit DistroWatch.com, which features the most popular distros based on the site’s visits (simply look on their right sidebar). Once you’ve found which distro you want to install, head over to their website and download the latest version. All Linux distros (like Windows) come in an .ISO format. For this guide, I’ll be choosing the latest version of Garuda KDE Plasma.
Note
You can customize each flavor with ease, so don’t worry if the design doesn’t look that great. KDE Plasma is the most customizable of them all, and XFCE is a close second. Gnome is basically “what you see is what you get”, yet minimal, fast, and stable (most of the time, that is).
2. Create a bootable USB with Linux
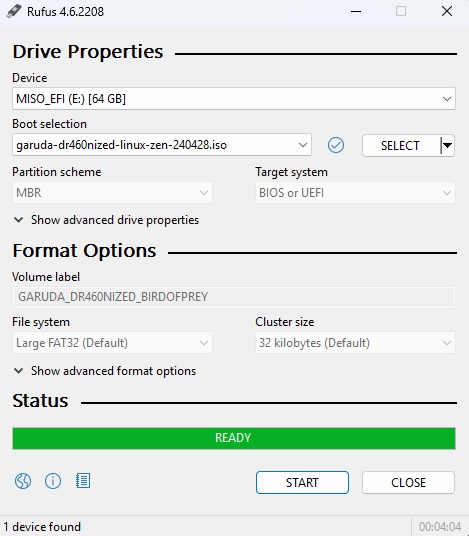
Now that you have downloaded your preferred Linux distro, it’s time to put it on a USB drive and install it on our computer. To do so though, we’ll have to use a free and easy-to-use tool that takes all the files from the ISO file that we just downloaded and basically writes them to our USB stick.
- Download and install Rufus.
- You can do that by either installing it through the Microsoft Store (which is already installed in Windows).
- Alternatively, you can download it from its official website at Rufus.ie.
- Connect a USB device with at least 8GB of storage to your PC.
- Launch Rufus, look in the “Device” section and make sure that your USB device is selected.
- Click on the “Select” button, find the Linux .ISO file that you downloaded, and select it.
- Click on the “Start” button and wait until Rufus finishes the process.
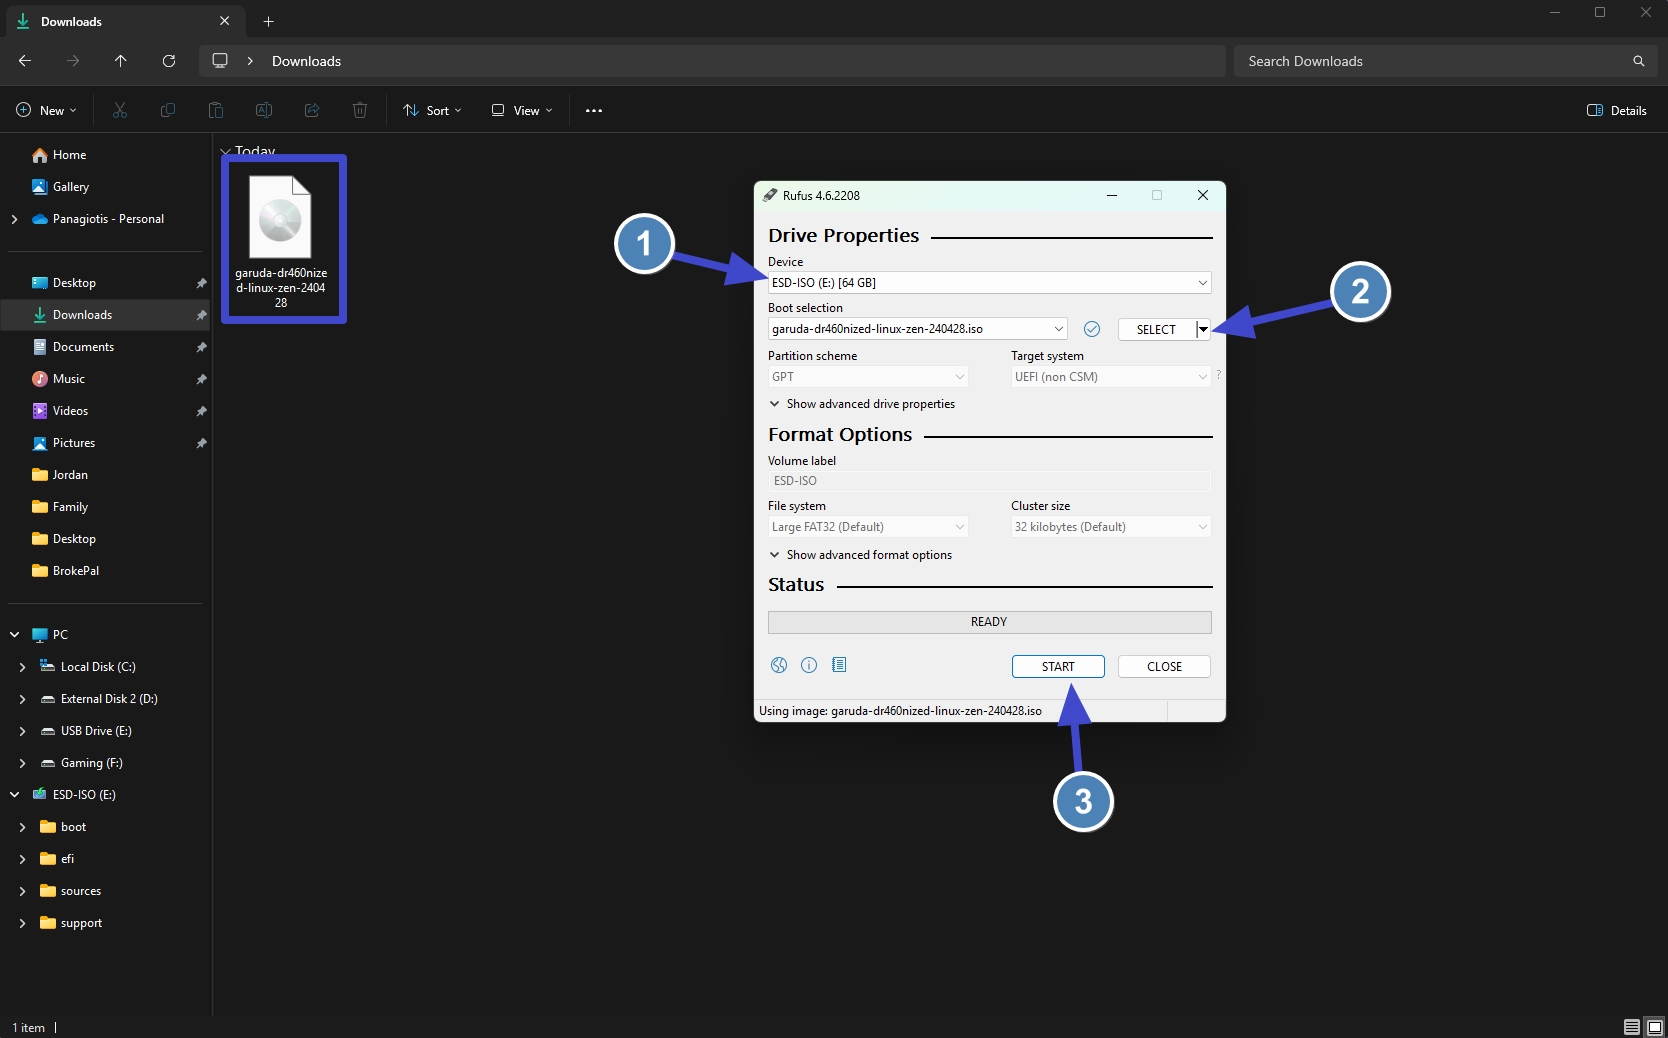
If for any reason Rufus displays an error, simply re-try the same steps. If it constantly gives you an error, then re-download the .ISO file and try again – sometimes the download process may get interrupted and you end up with a damaged ISO file.
You know the process has been successfully completed when you see the “Ready” status with a green background color.
You now have a bootable USB device with Linux in it, congrats! You can use this USB device to launch your Linux distro on any device that you can possibly imagine, whether that’s a PC or a laptop (new or old).
3. Install Linux
It’s time to start the installation process. To do so, you need to keep your bootable USB device connected to your computer at all times. Now, if you’ve seen any tutorials before this one, you must have seen that in order to install any Linux distro, you’ll have to find out how to enter your UEFI/BIOS boot menu – which sounds scary.
We’ll take a different and much easier approach.
Note
Right-click on any of the following images and click on “Open image in a new background tab” for full-size. If you’re visiting from a mobile device, tap and hold onto any image, and select “Open in a new background tab“.
The installation is fairly easy, but I’ll guide you through it, as you have the option to either install Garuda Linux alongside Windows or completely delete Microsoft’s operating system and keep Garuda. If you’re a gamer who wants the best possible performance and lots of free space to install their games, keeping only one operating system is, arguably, the best way.
-
Advanced restart to your UEFI/BIOS boot menu
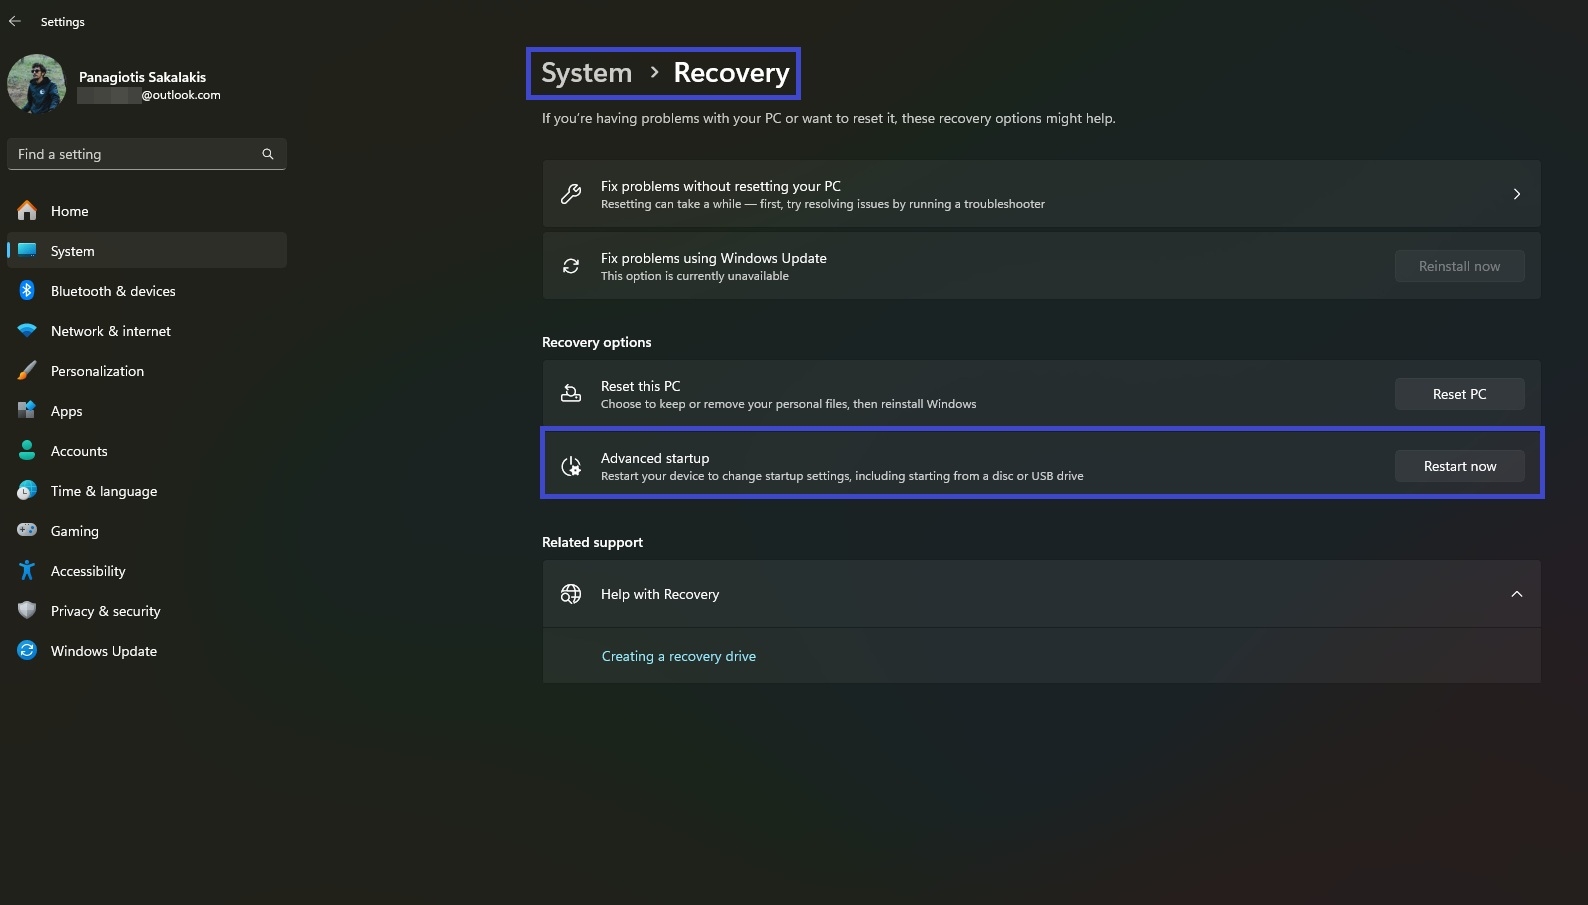
Open the Settings in Windows, go to System, click on Recovery, and click on the “Restart now” button in the Advanced Startup section.
-
Boot your PC with your bootable Linux USB
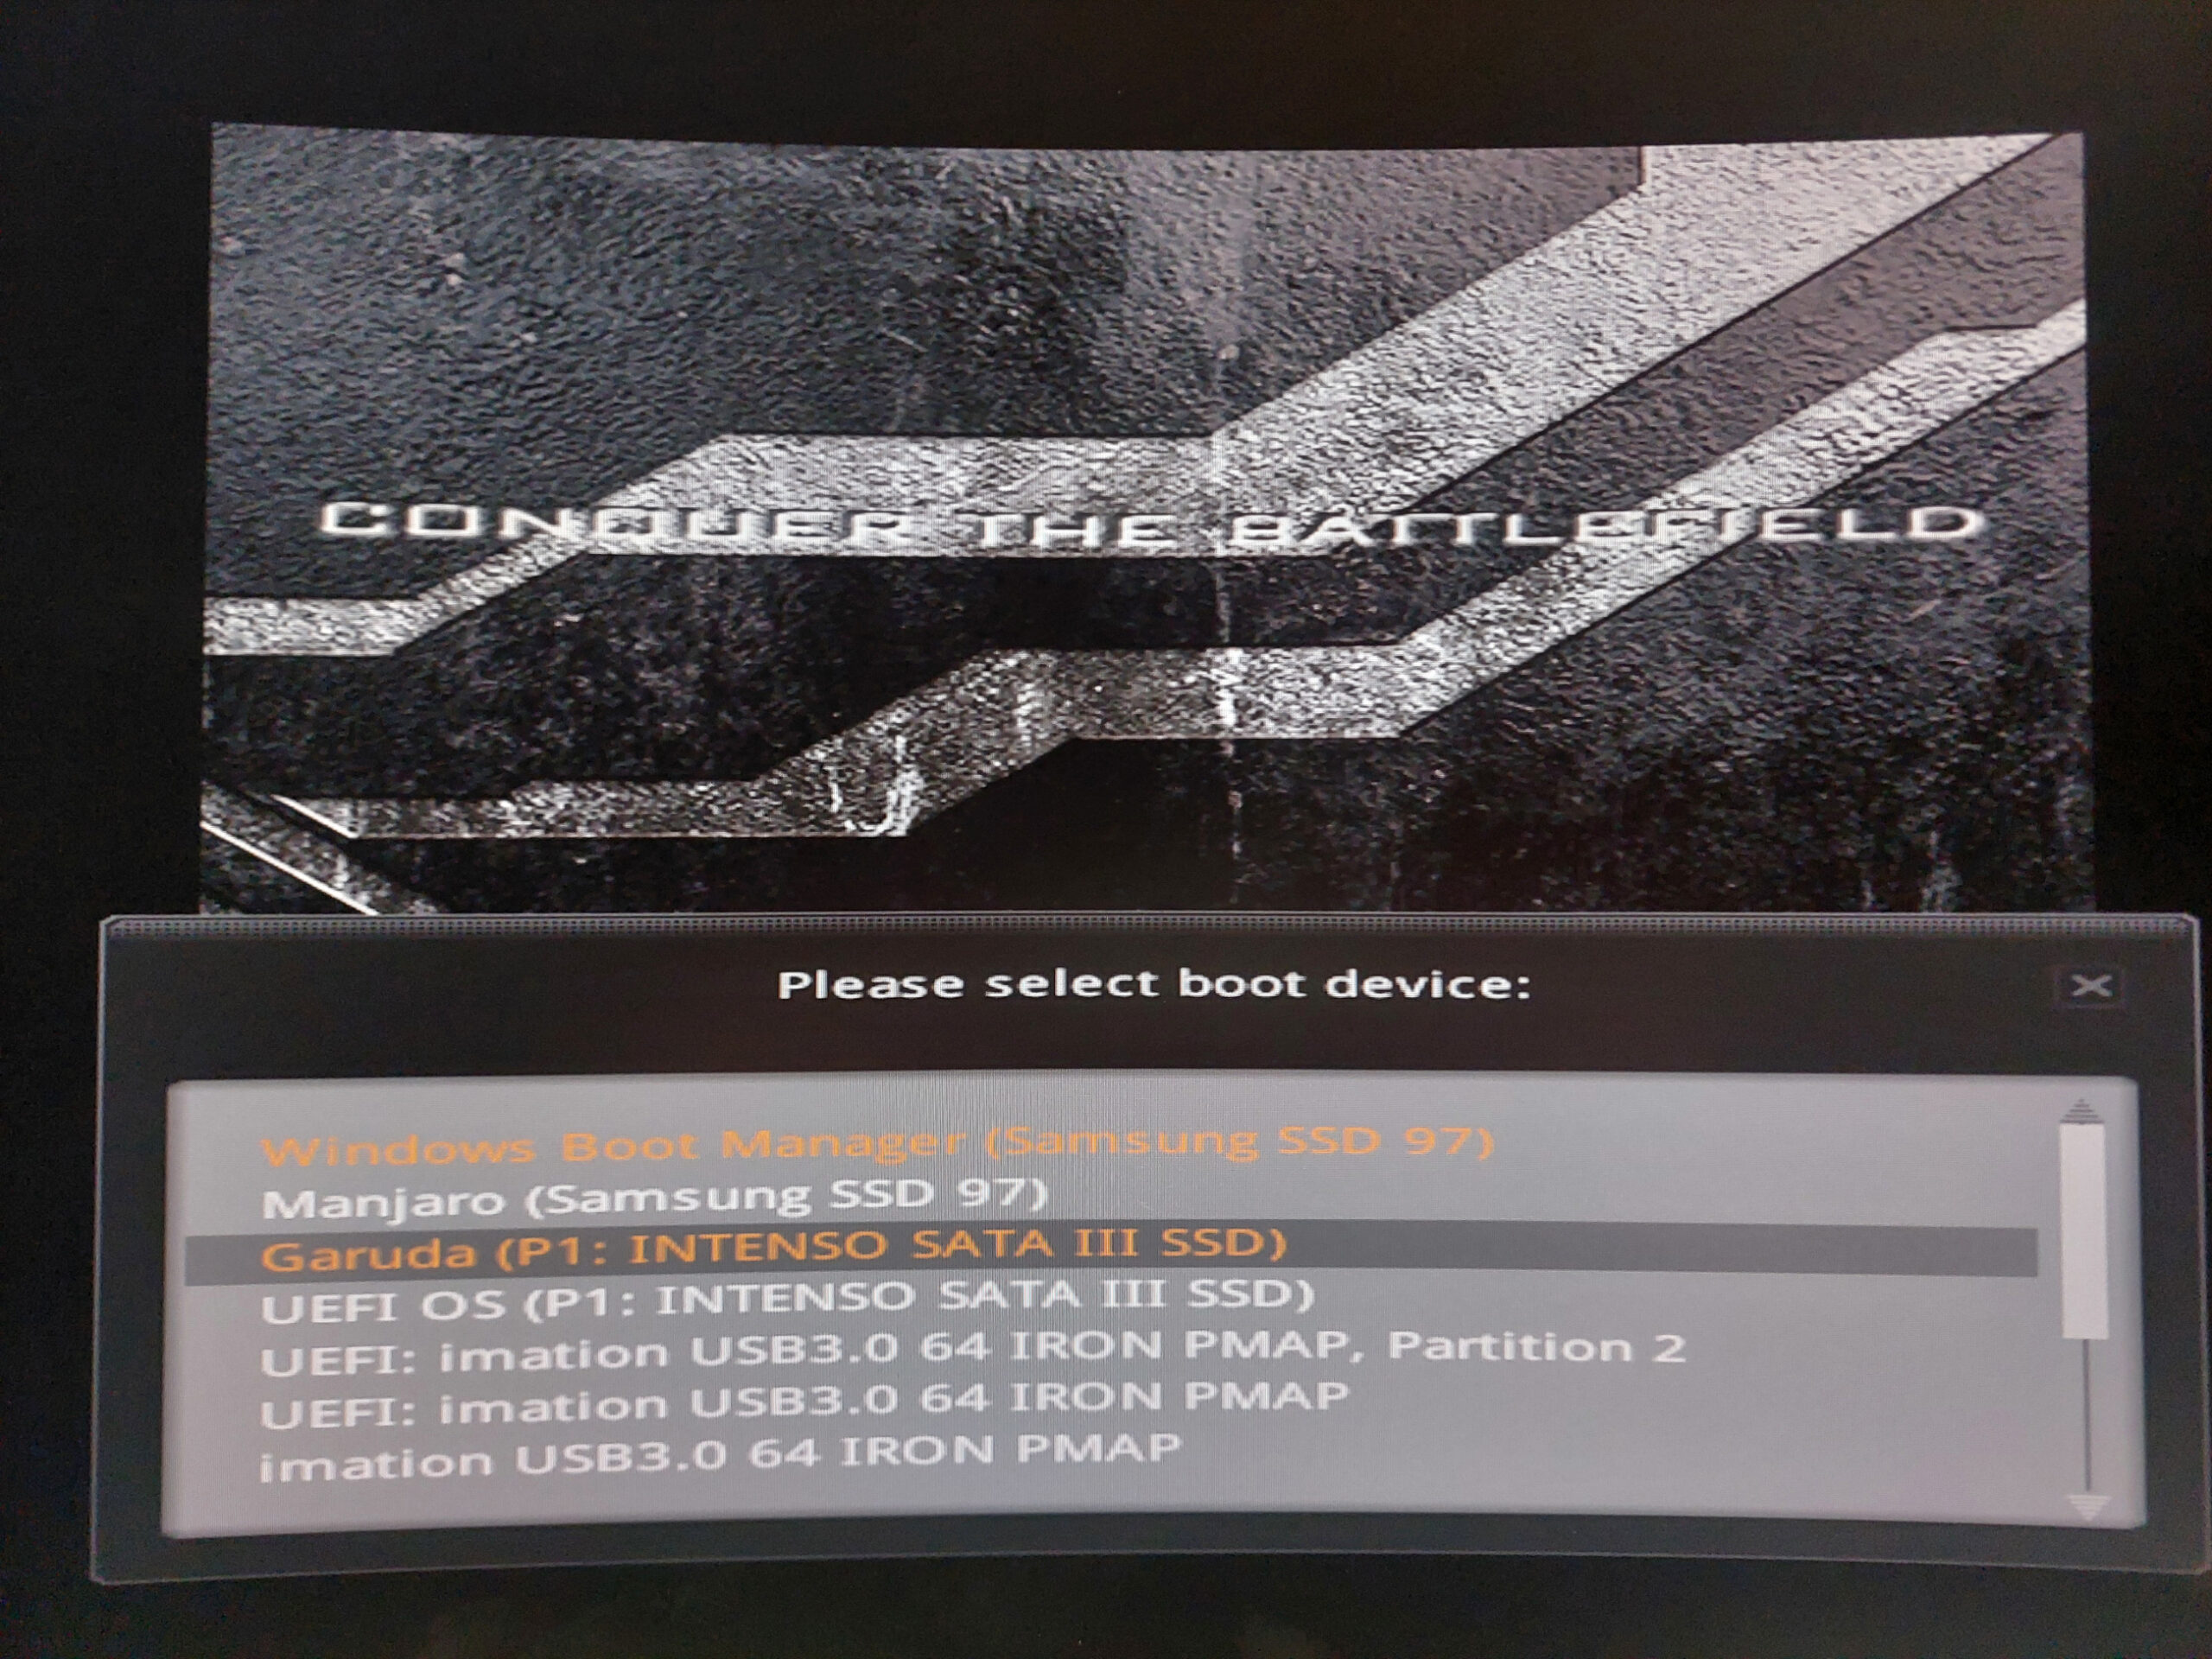
That’s it, your PC will restart and it will take you to your UEFI/BIOS boot menu automatically. It’s basically a list of your connected disks and USB devices, and the only thing that you’ll have to do is find your USB device in that list and click Enter. If you did everything right, you’ll end up seeing the screen shown above.
-
Garuda Linux ‘Welcome Screen’
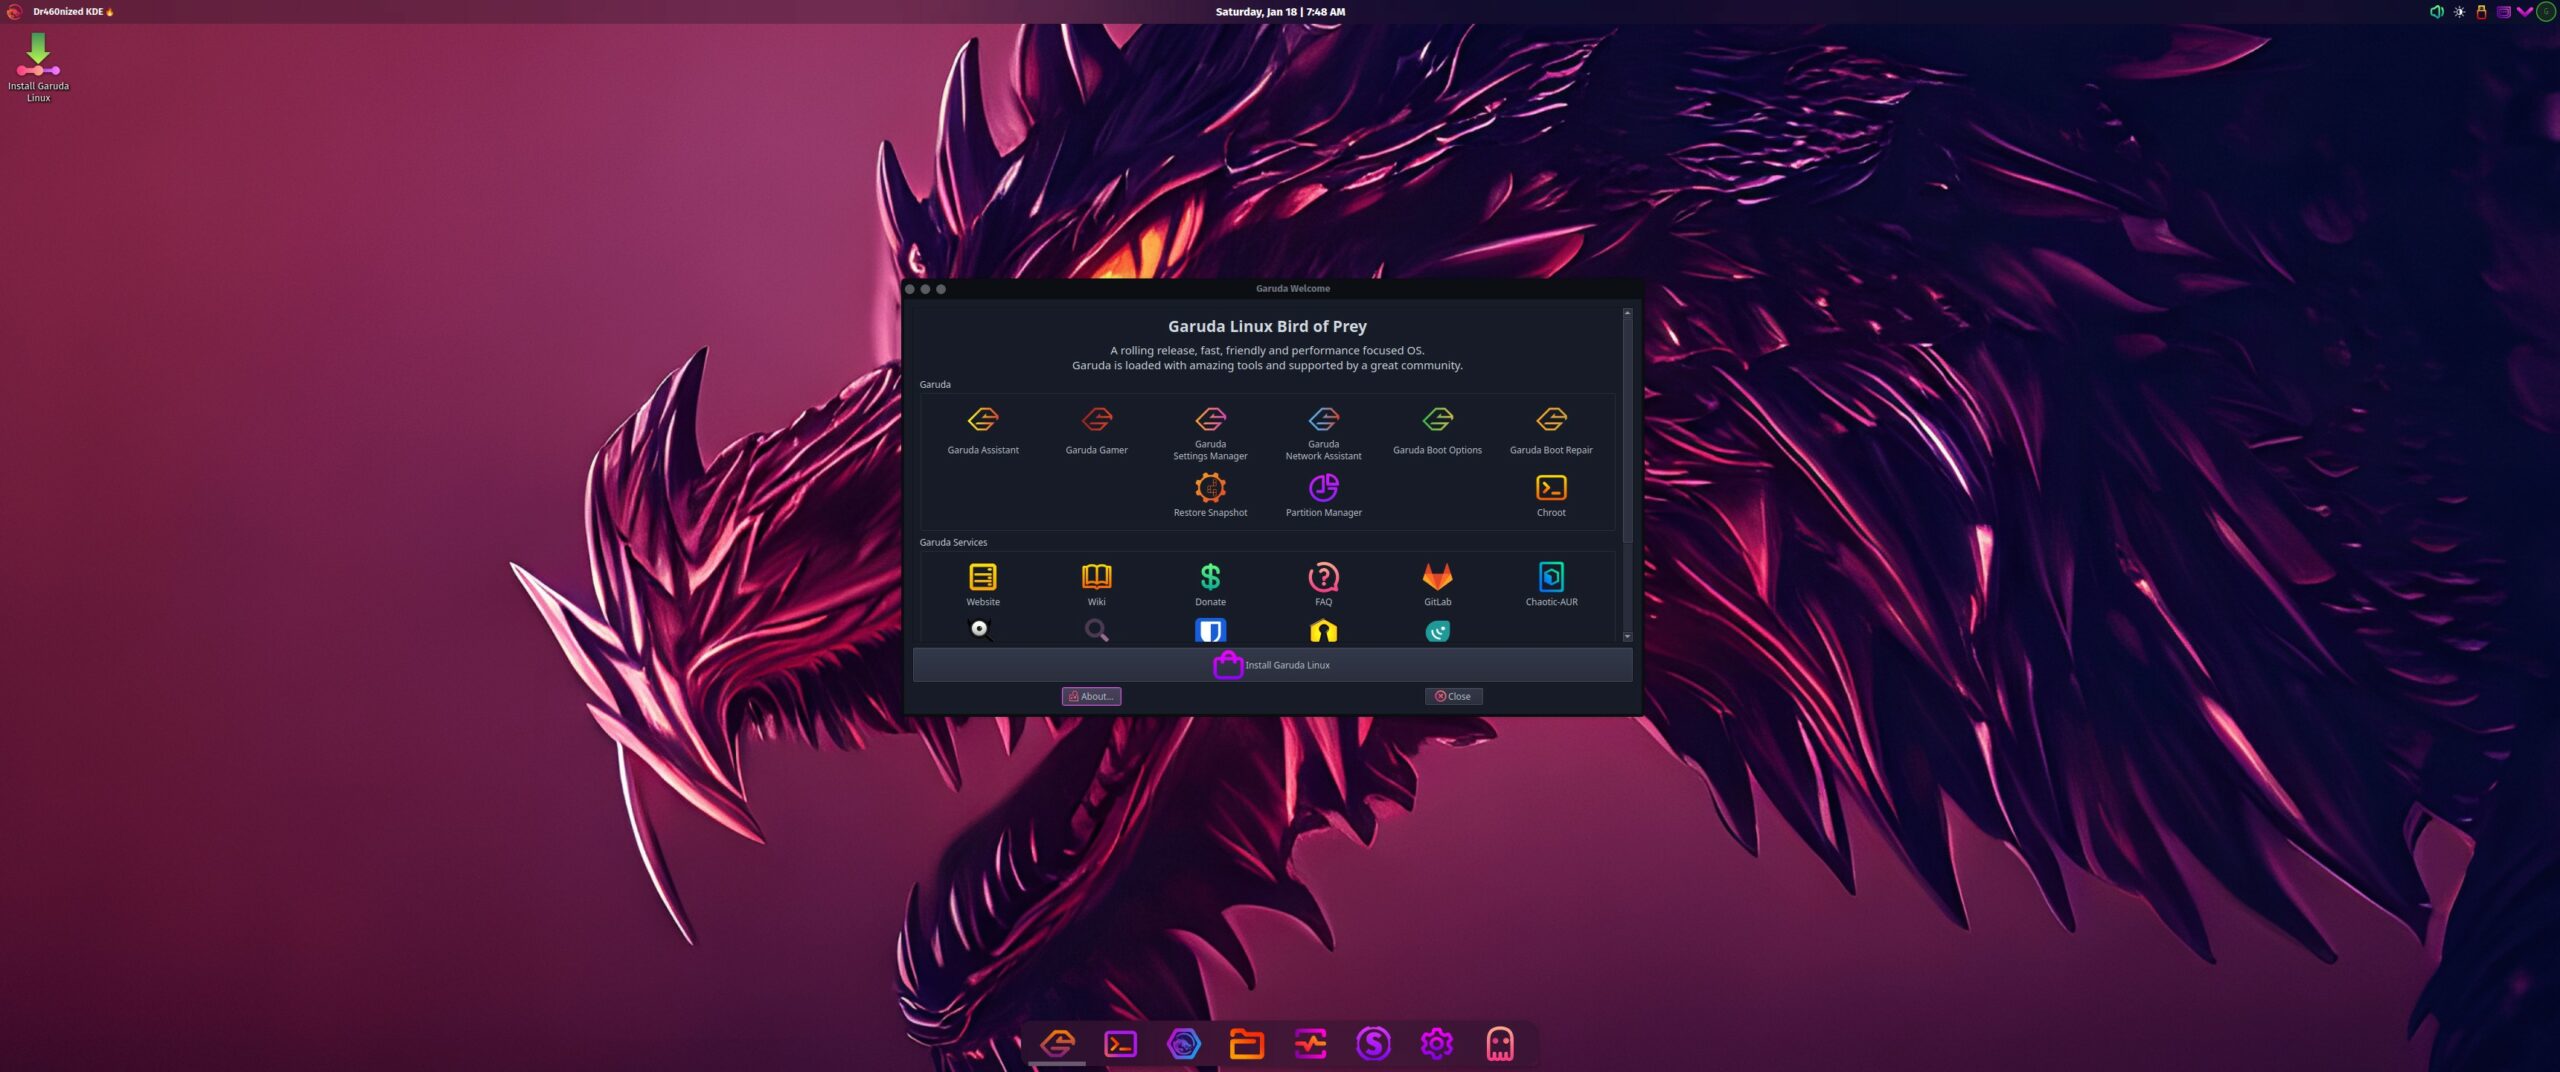
Welcome to Garuda Linux! But that’s just a preview running from your USB device, which may feel sluggish and slow, but that’s just Linux being able to run even from a USB device – which is pretty awesome if you ask me.
-
Launch Garuda’s Installer
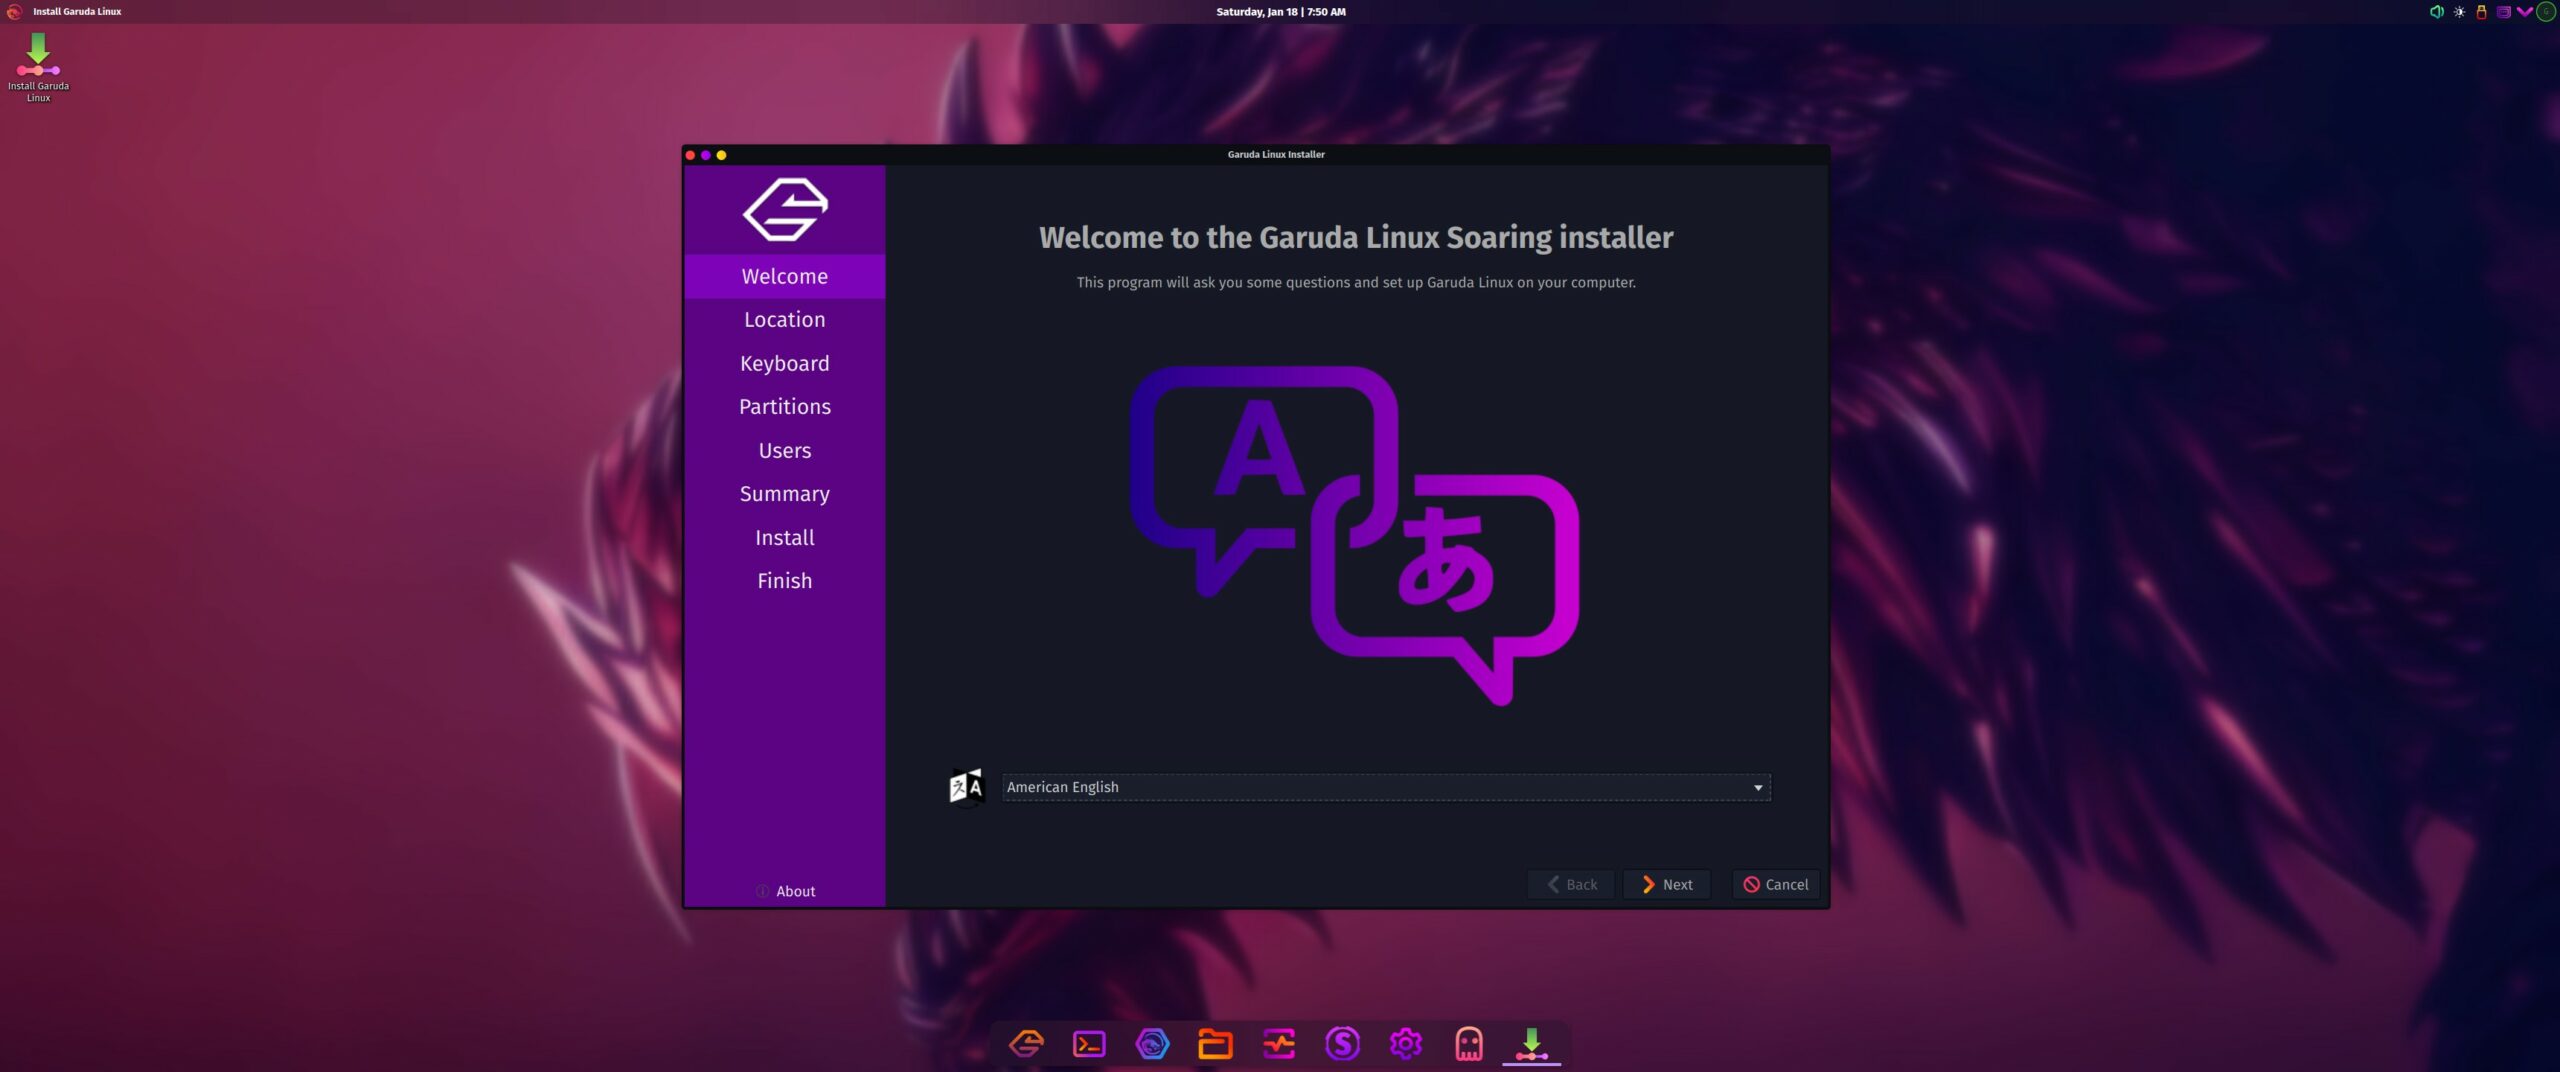
To start installing Garuda on your PC, just launch the “Install Garuda Linux“. The icon should be both inside the welcome window and on your desktop. Start by choosing a primary language (you can add more later) and click on “Next“.
-
Choose your primary location
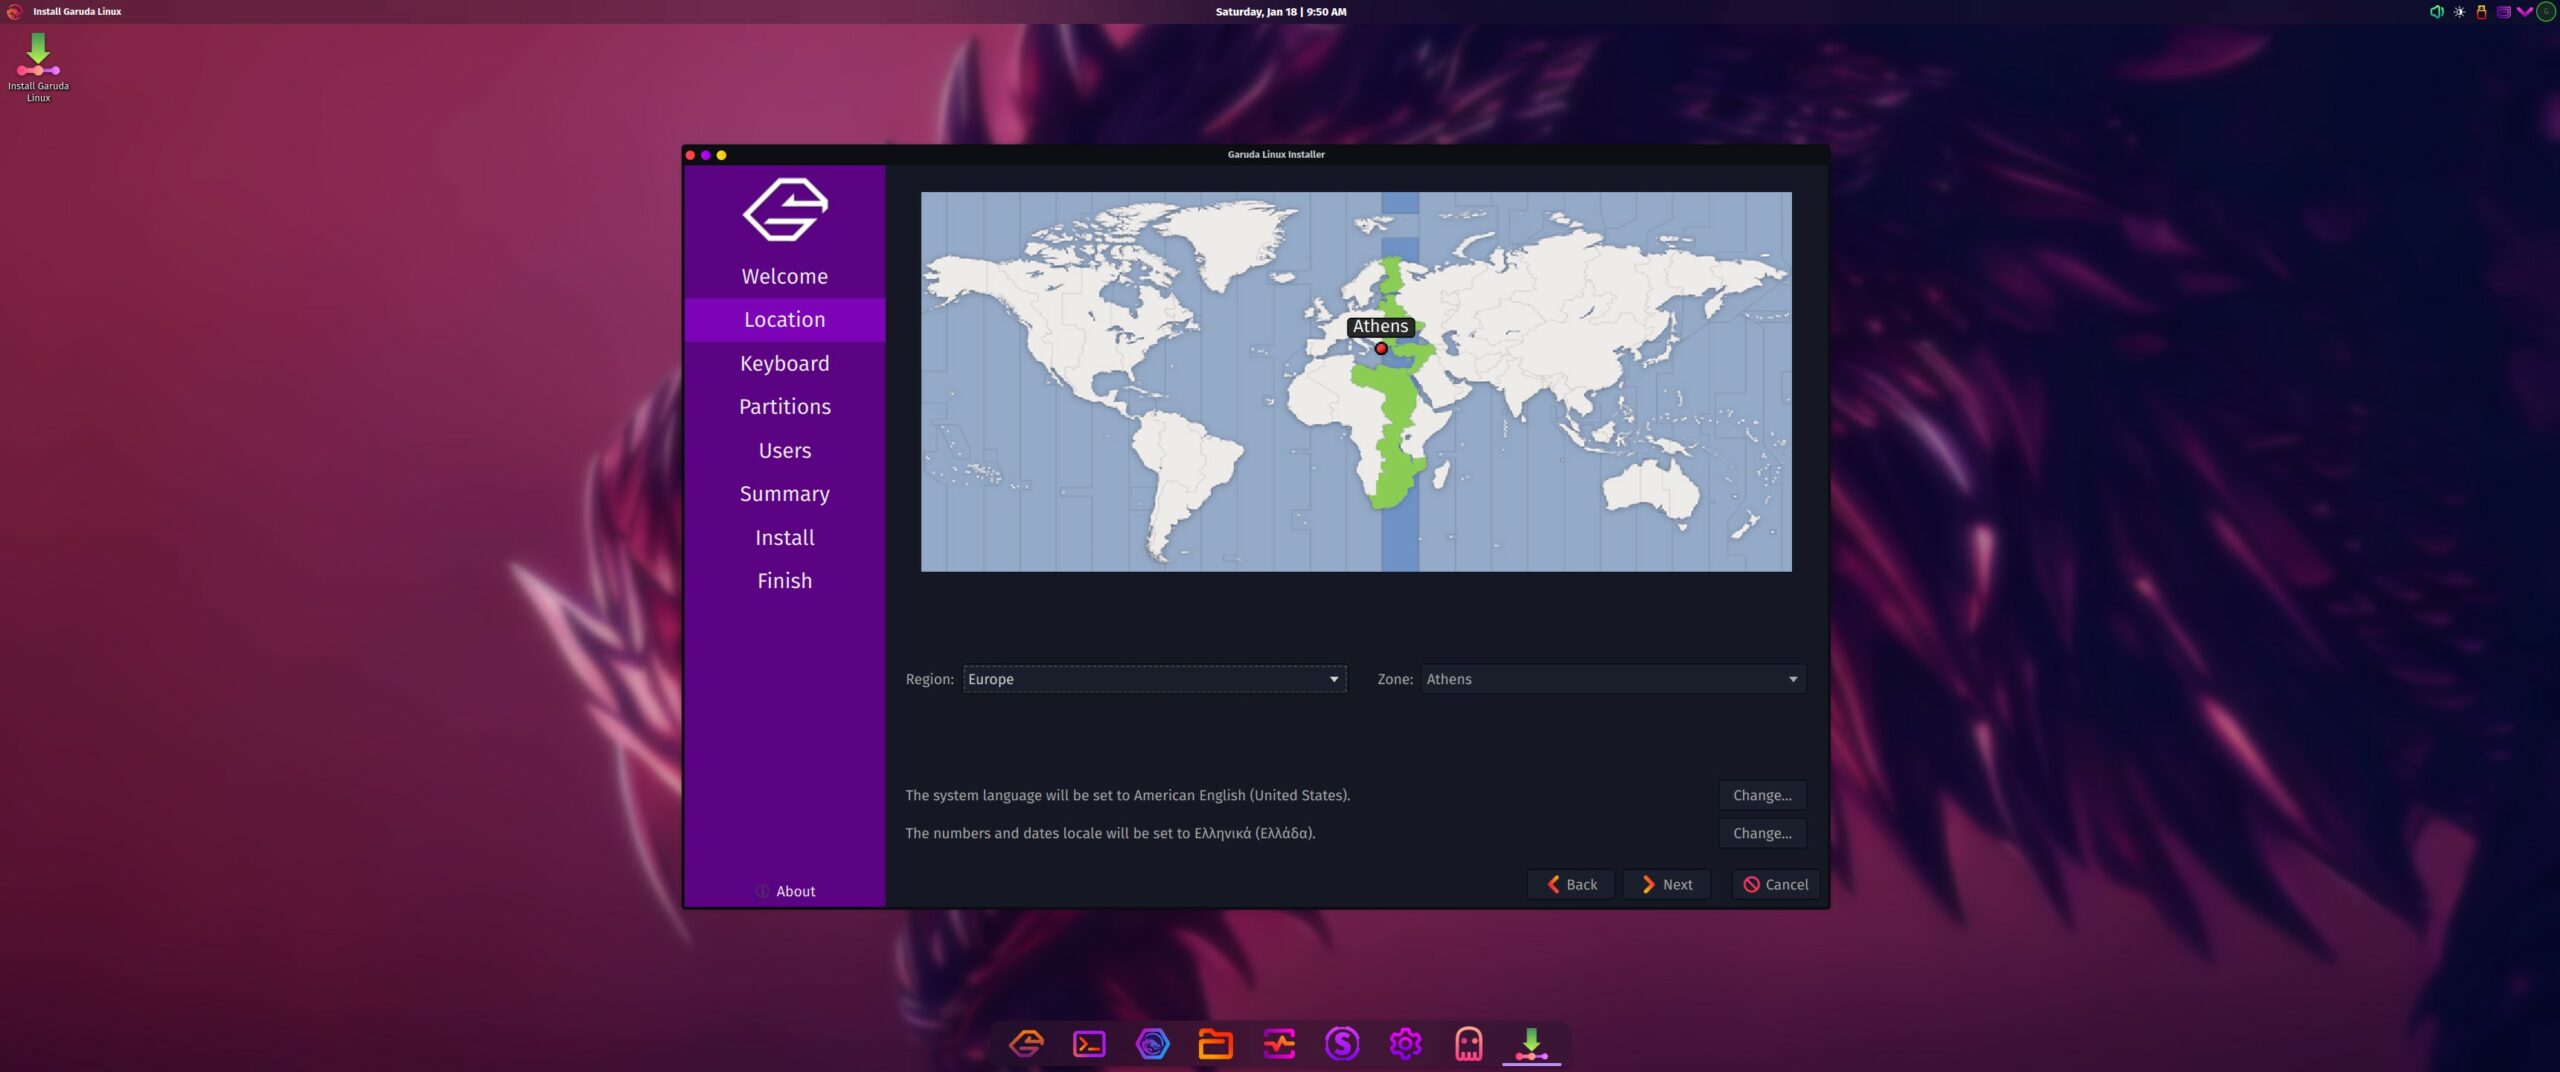
Choose your Region and Zone (which it should find automatically) and click on “Next” to continue. Note that those settings will take effect in your PC’s date and time settings, weather metrics, money symbols, etc.
-
Add a primary keyboard language
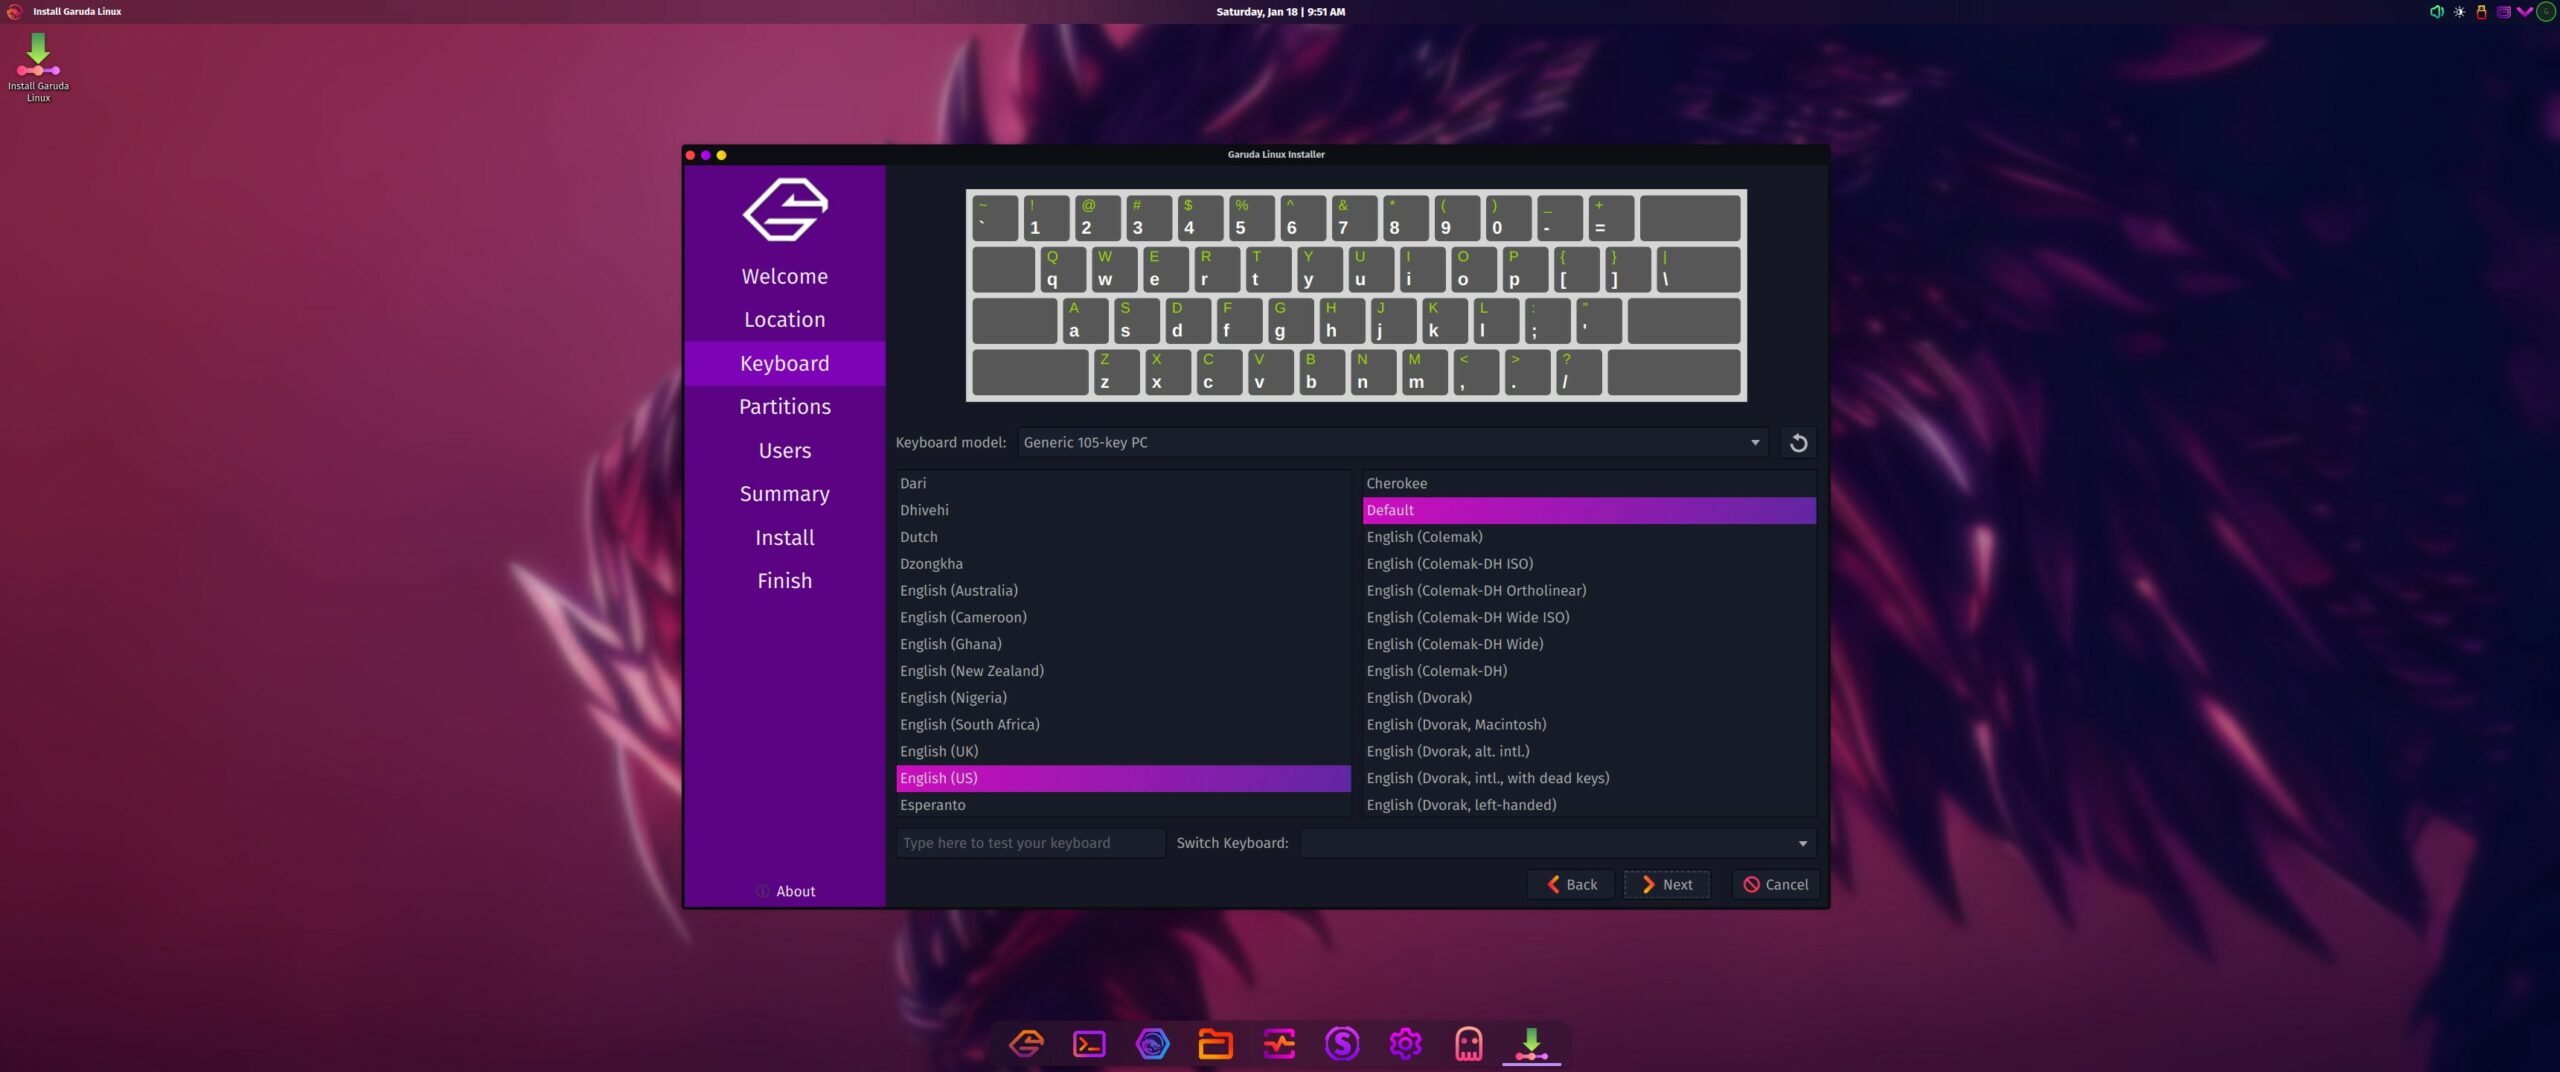
Although you can add multiple languages and change them with ease, for now just select “English (US)” and “Default” in the Cherokee section, and click on “Next” to continue.
-
Choose if you want to install Garuda Linux alongside Windows
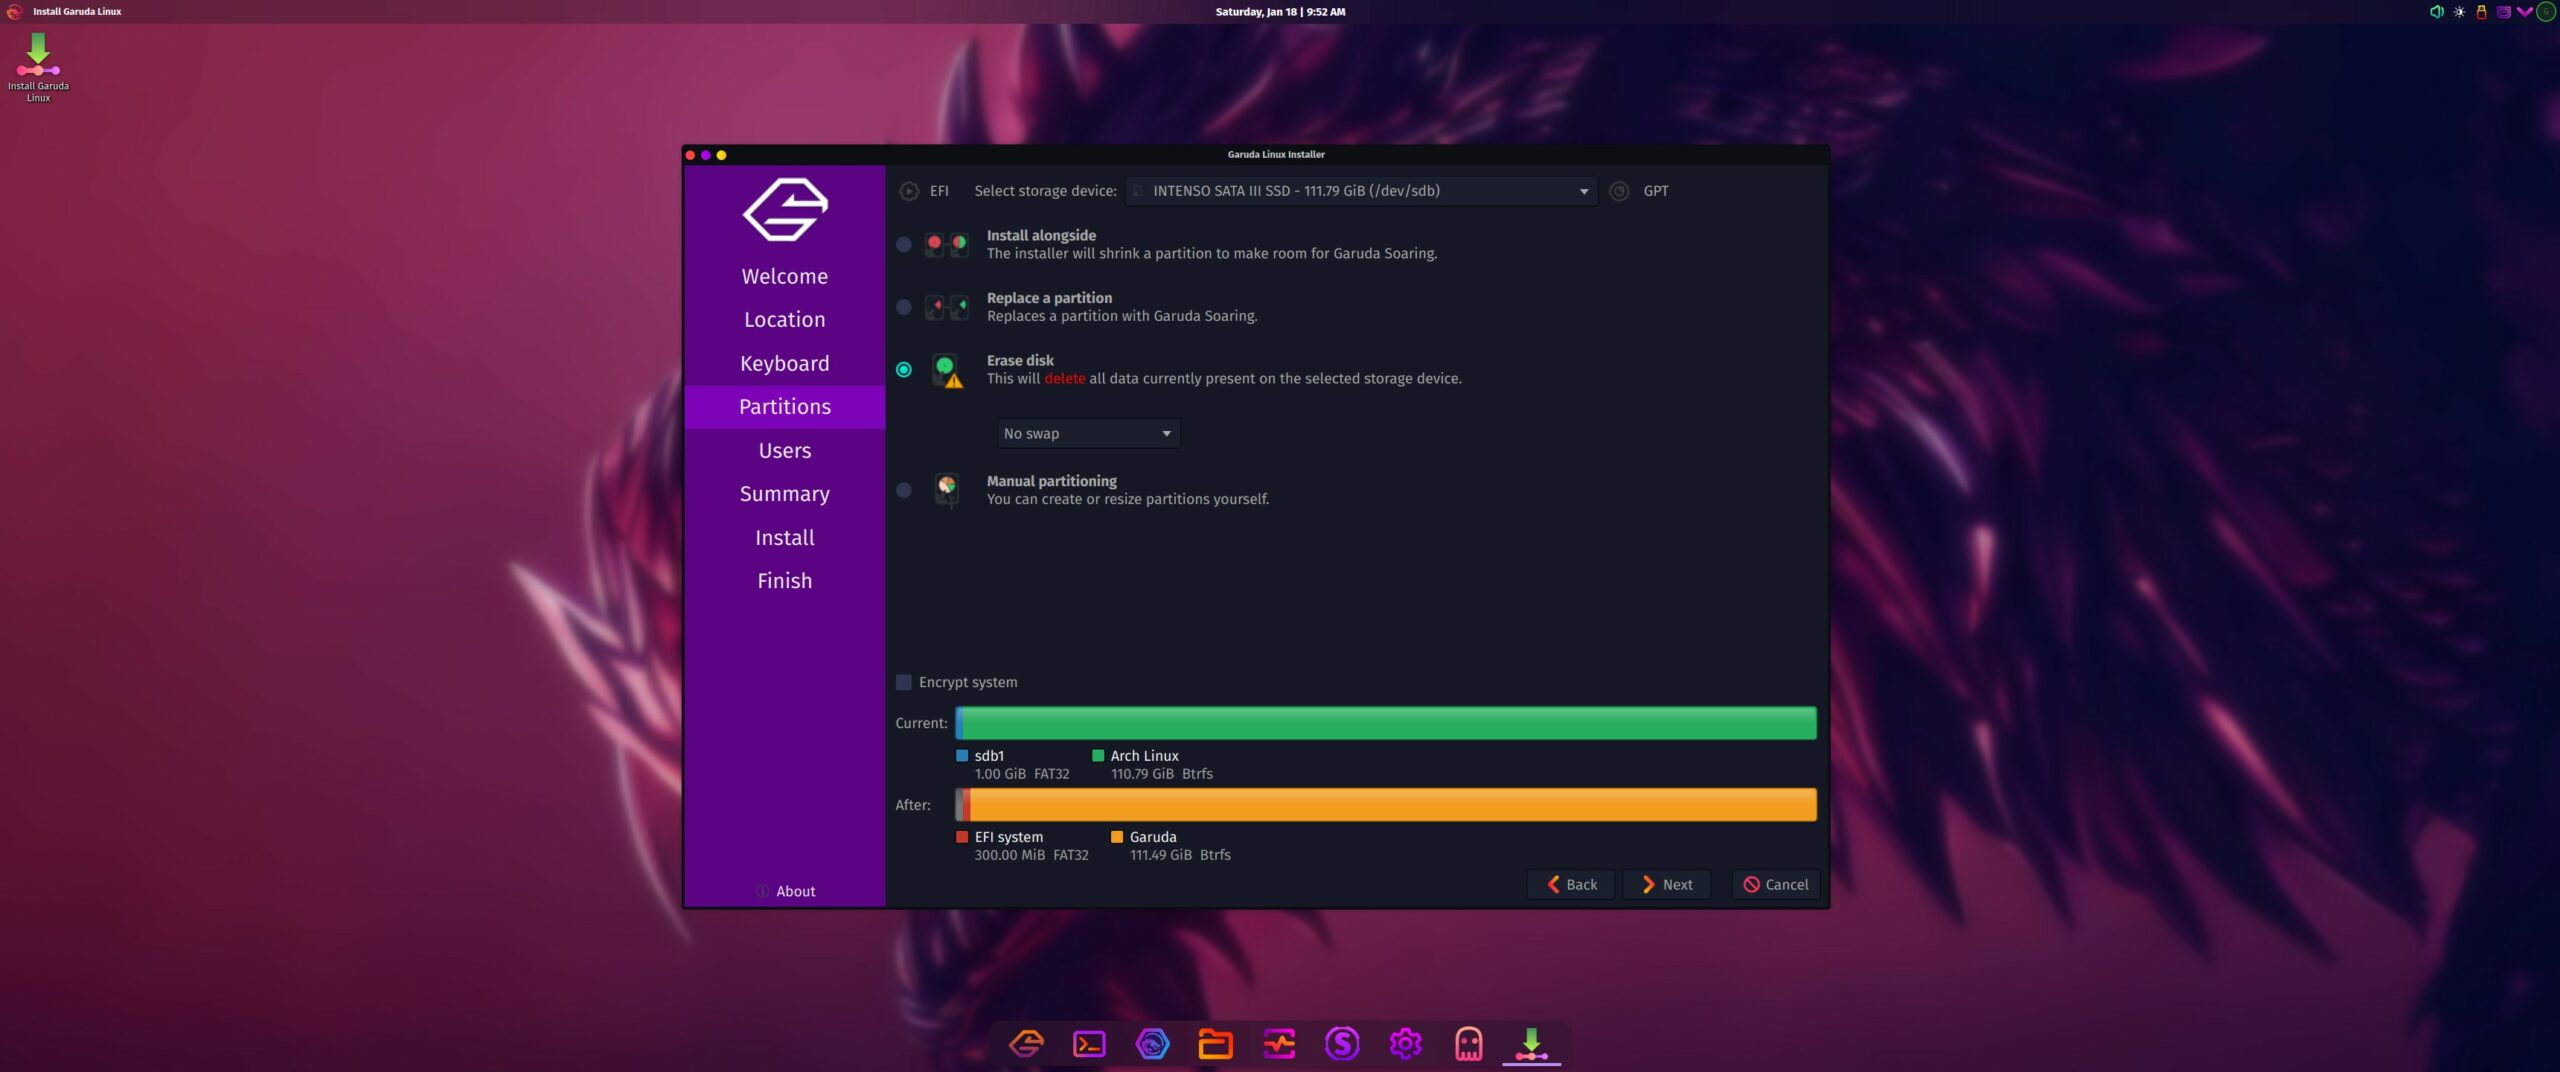
This is the most important step: You can choose the option “Install alongside“, which will let you choose how much space you want to give to Garuda Linux while keeping Windows intact, or “Erase disk” to remove everything and only keep Garuda as your main and only operating system. Make sure that you have selected the right disk before proceeding to the “Select storage device” at the top.
-
Create your admin account
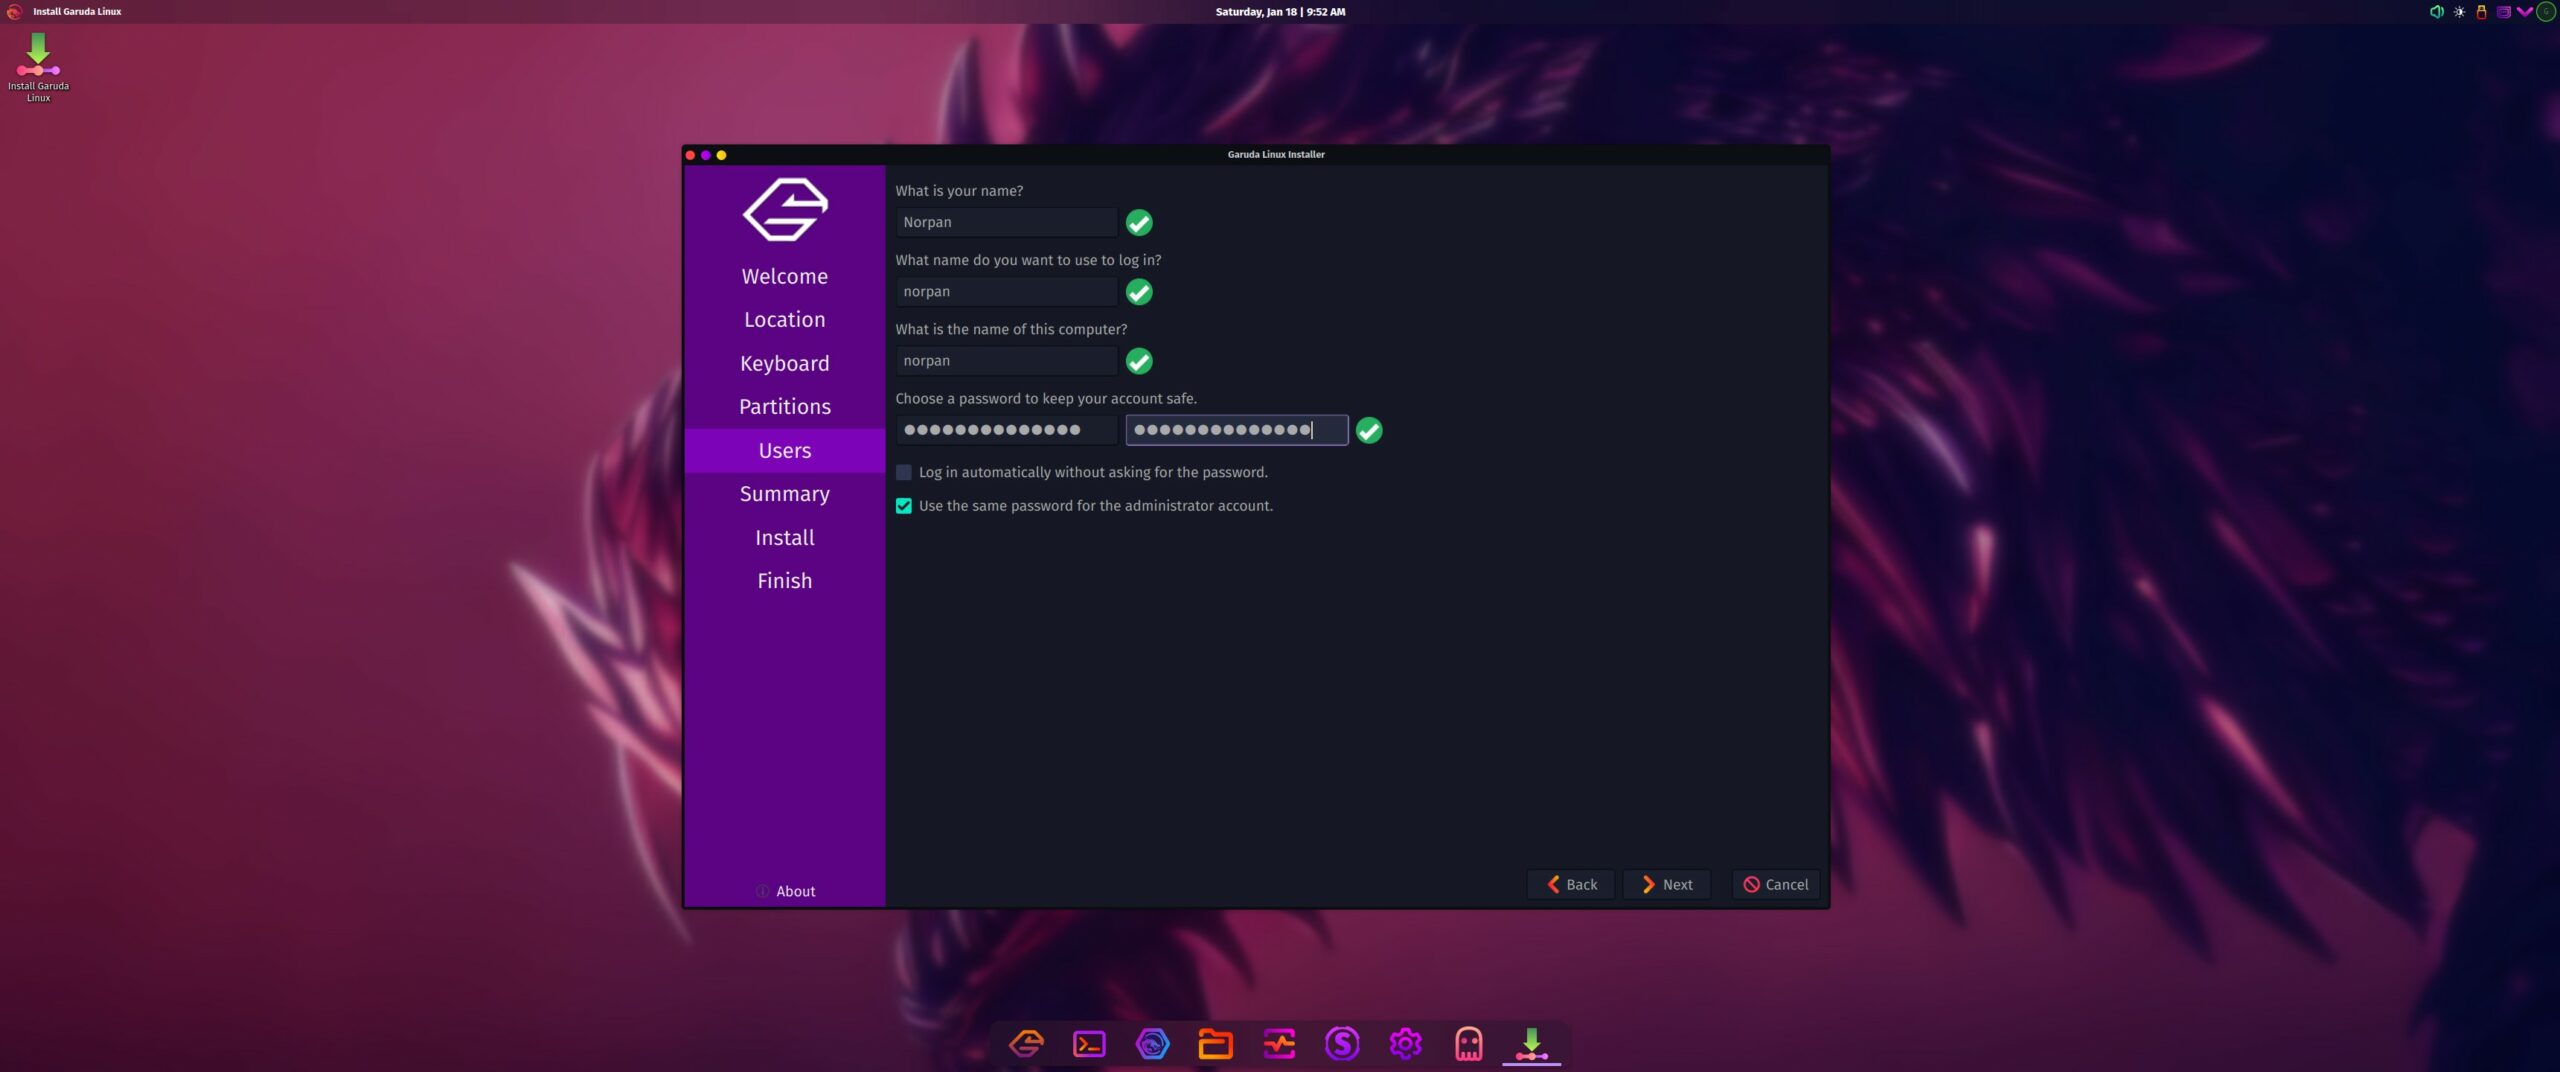
First, add your name and username, name your computer, and then add a password which you’ll use not only to log in to your account each time the operating system starts up but also when you’re trying to make changes.
-
Check your installation’s summary
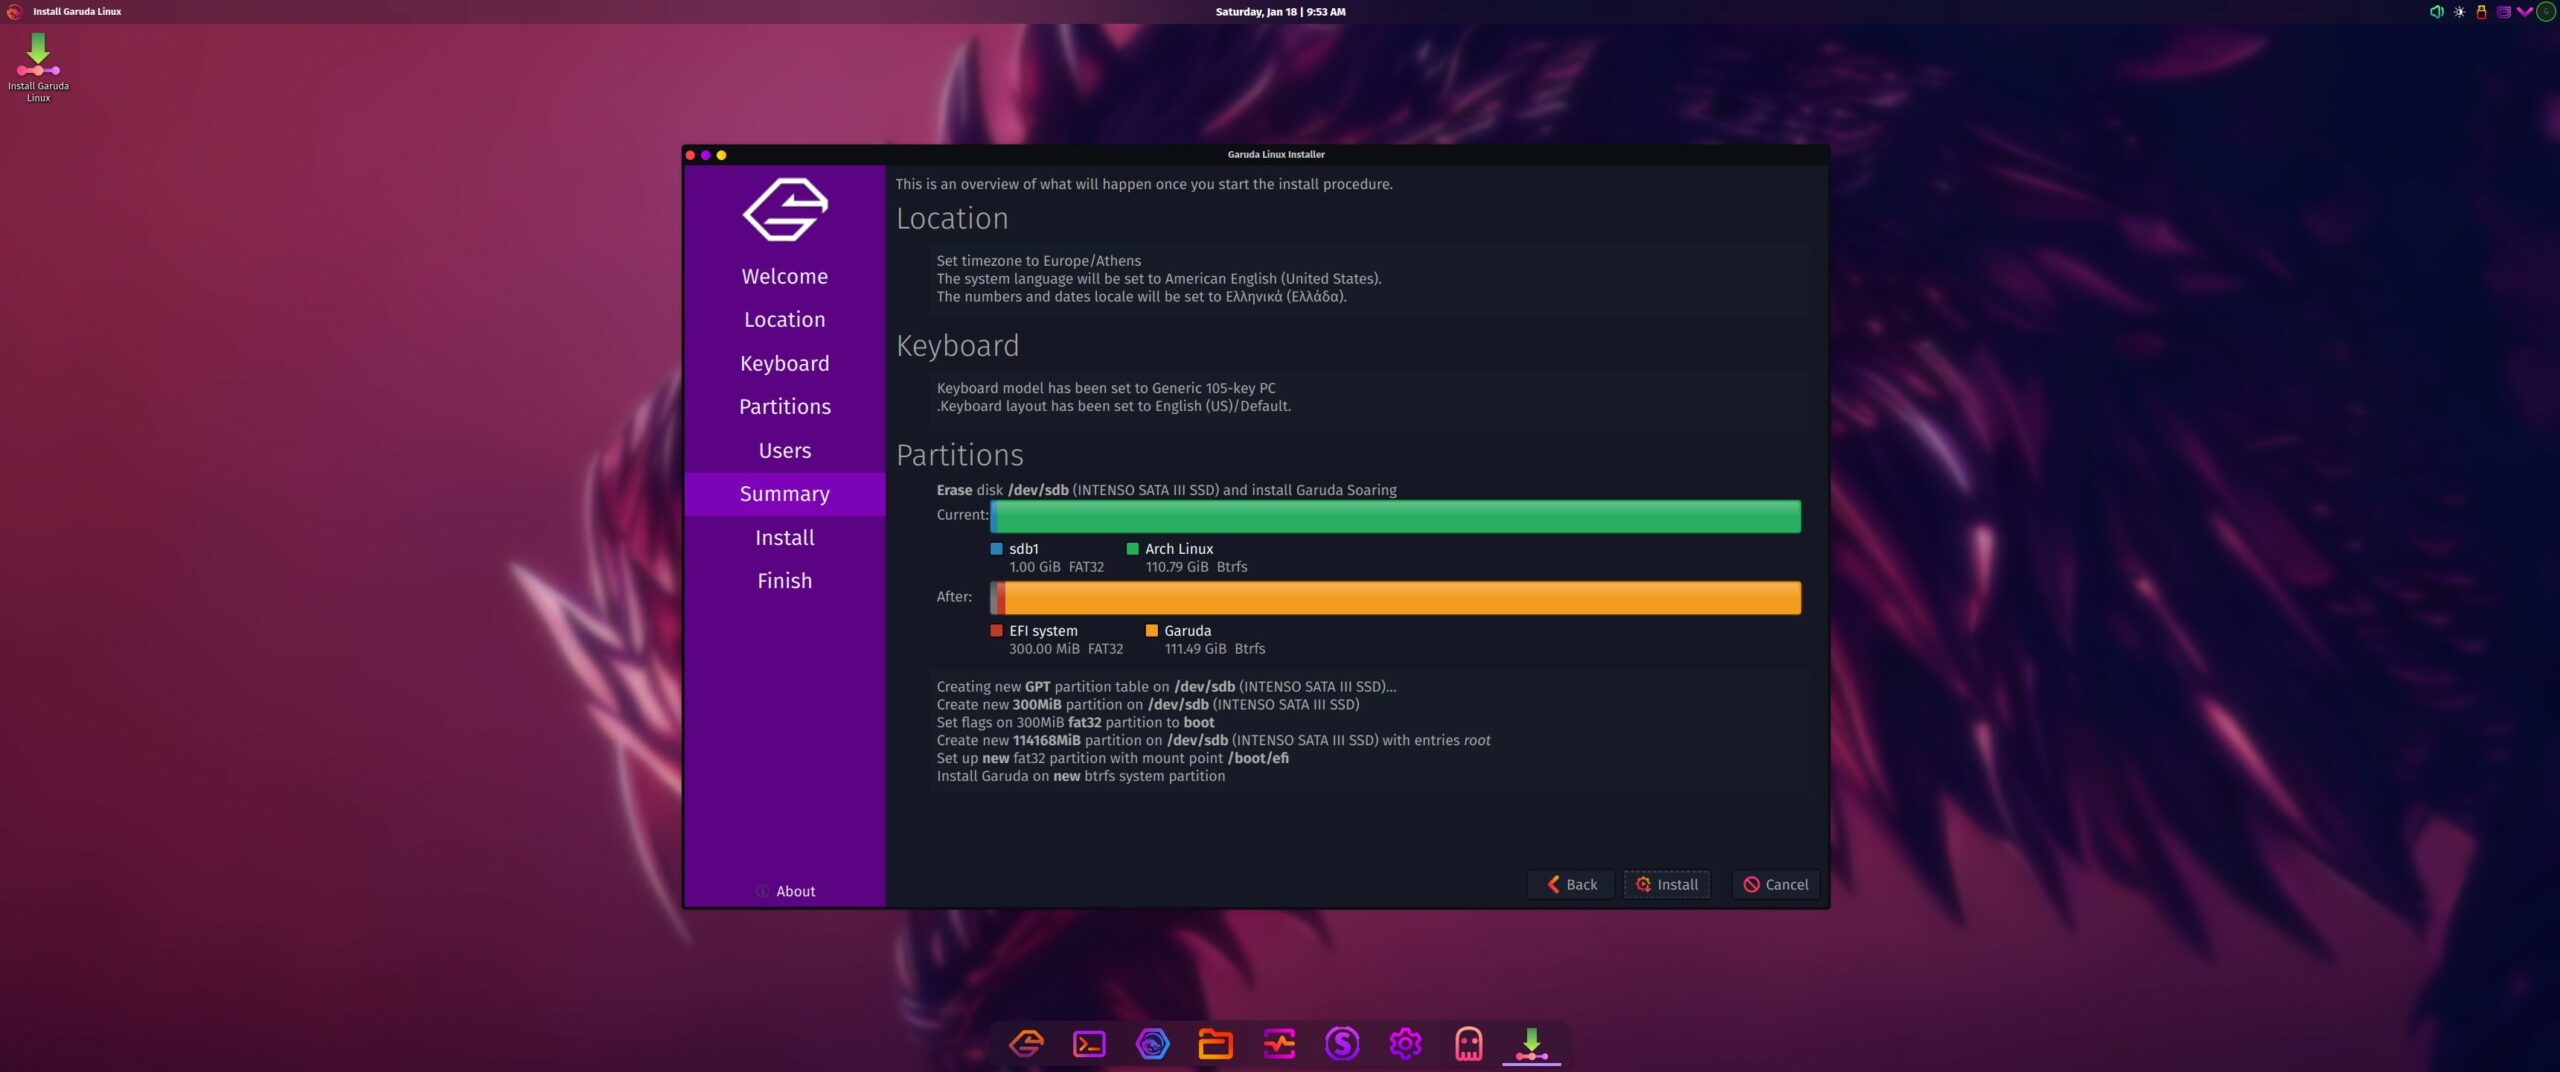
Garuda’s installer will show us a summary before proceeding with the installation. Make sure that your location, keyboard settings, and partitions are correct. If you see any mistakes, click on the “Back” button to move to previous steps and adjust them accordingly. If all looks right, just click on “Install“.
-
Wait for Garuda Linux to get installed
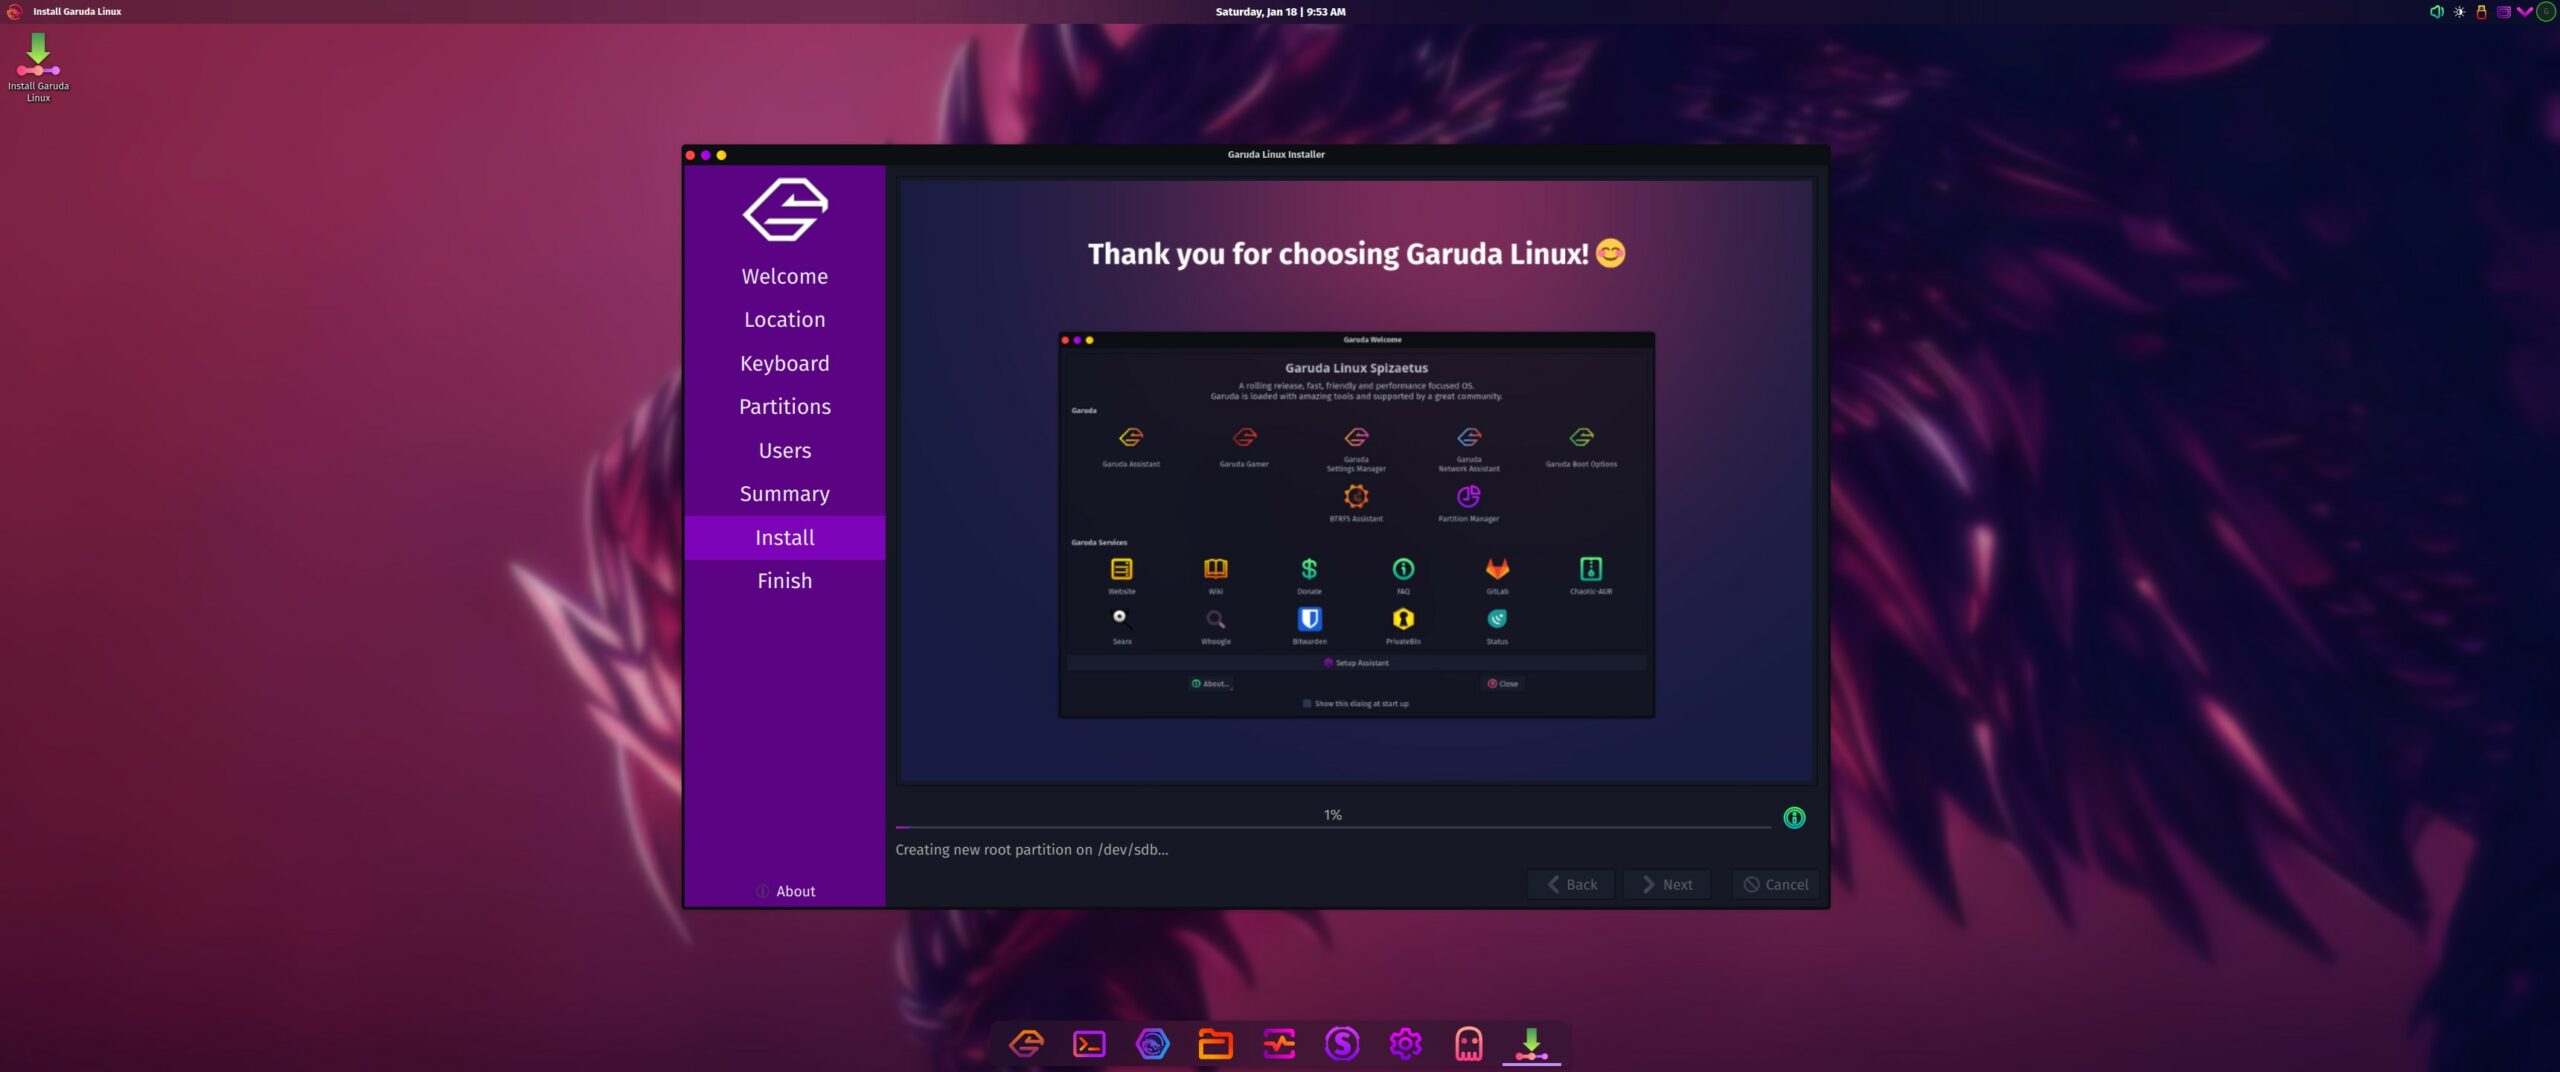
Now, it’s all about waiting for Garuda Linux to do its magic. The time needed for the installation to be completed is based on your system’s hardware, but it shouldn’t take more than a few minutes.
-
Restart your PC once the installation has been completed
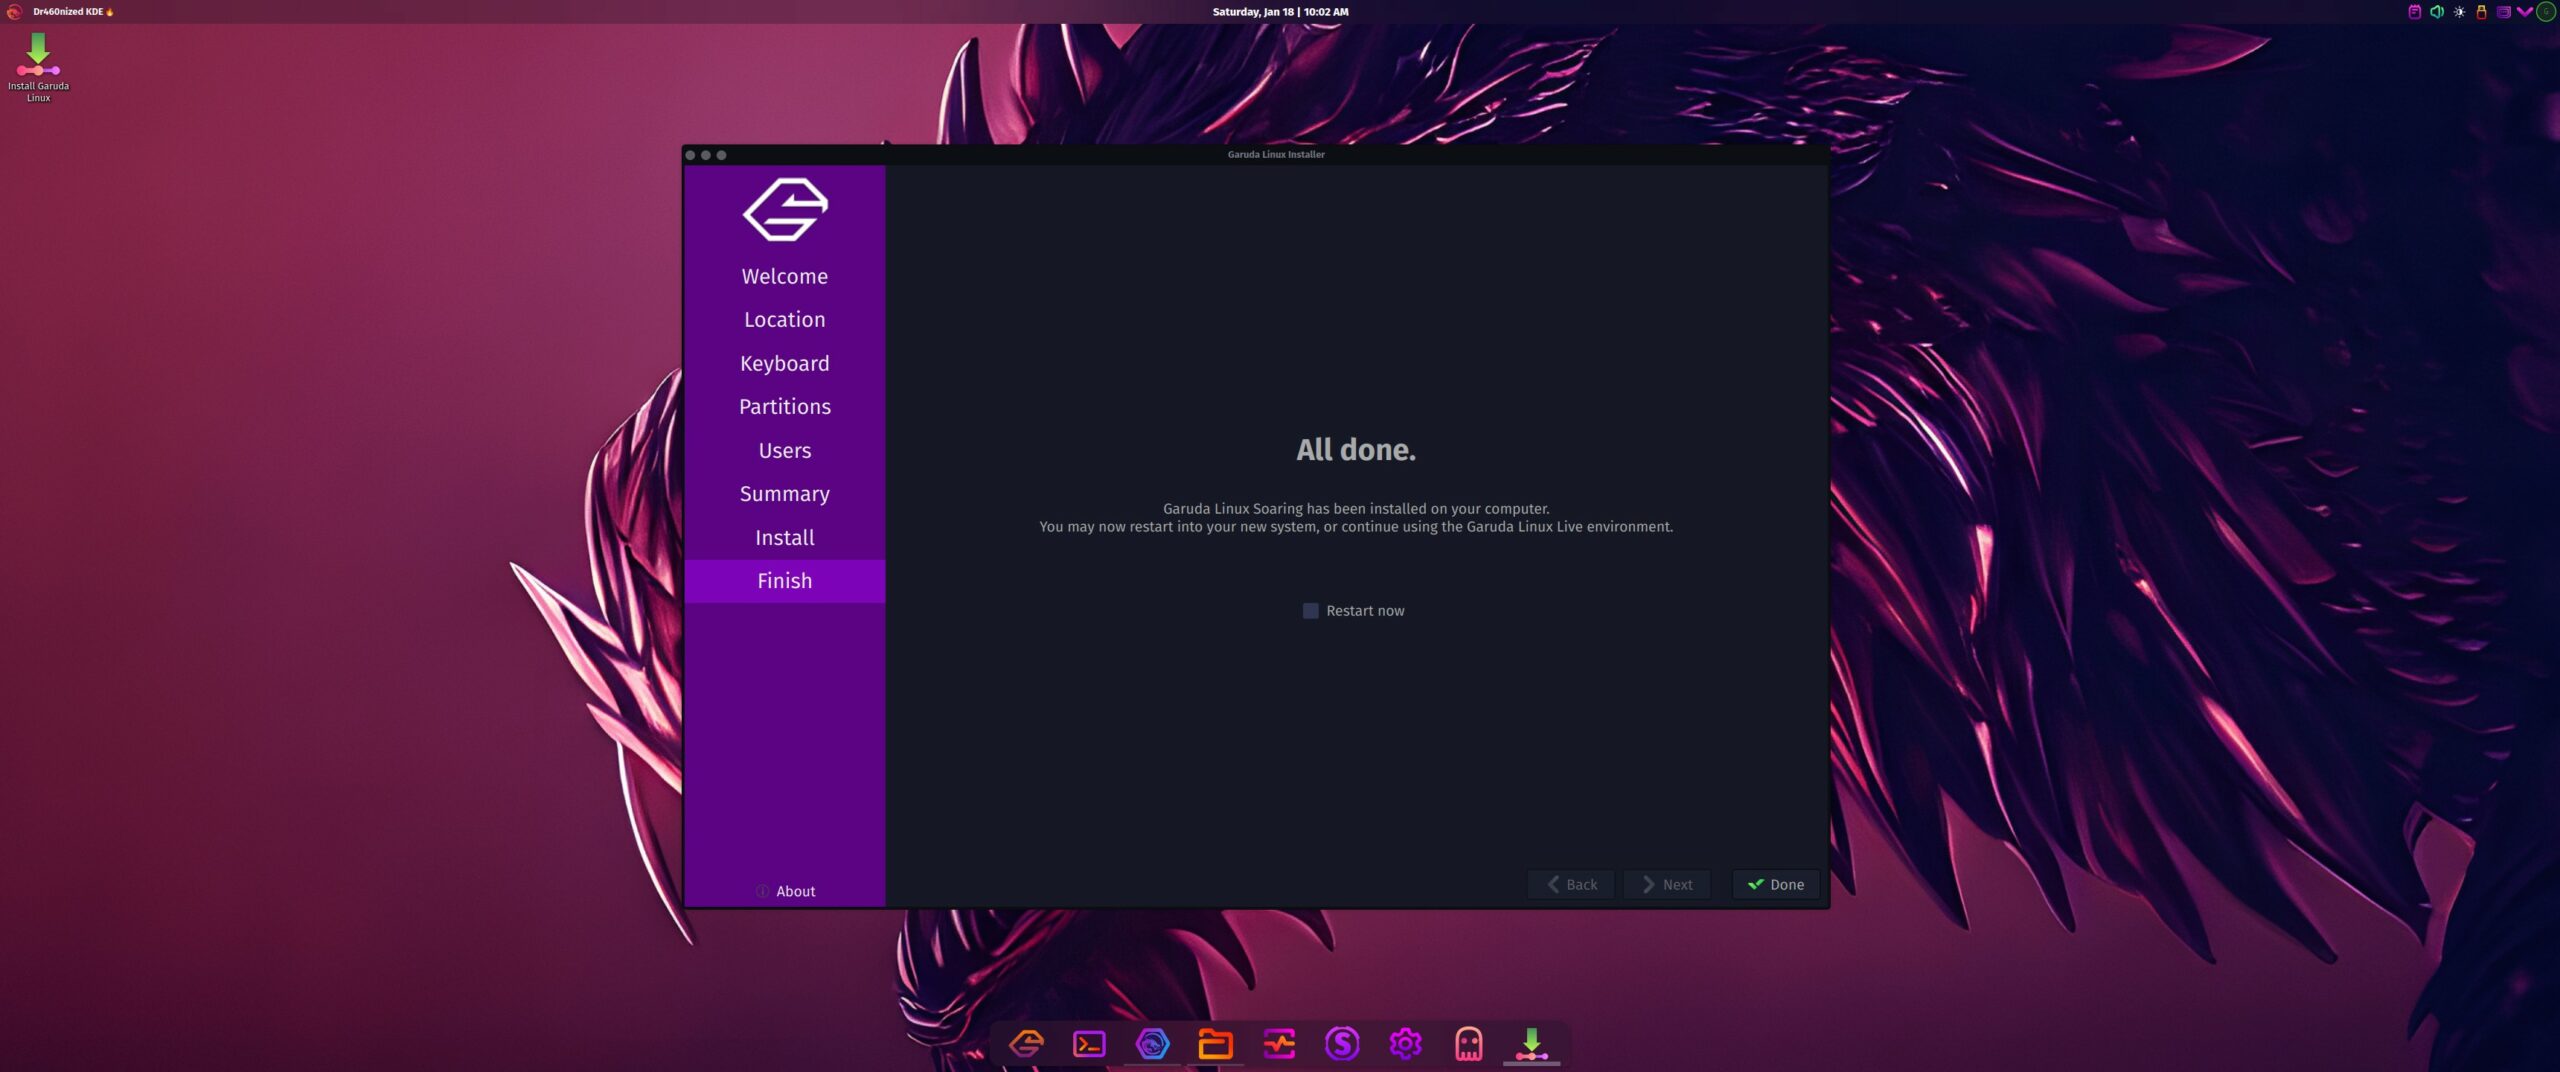
If you see the “All done” screen, that means that Garuda Linux has been successfully installed and it’s ready to launch. Click on the “Restart now” option and then click on “Done“. Once your PC restarts, remove the bootable USB device as you don’t need it anymore. If you install Linux alongside Windows and your PC boots up straight to Windows without giving you an option to start up with Linux, read the FAQs section at the end of this page.
-
Update Garuda Linux to the latest version
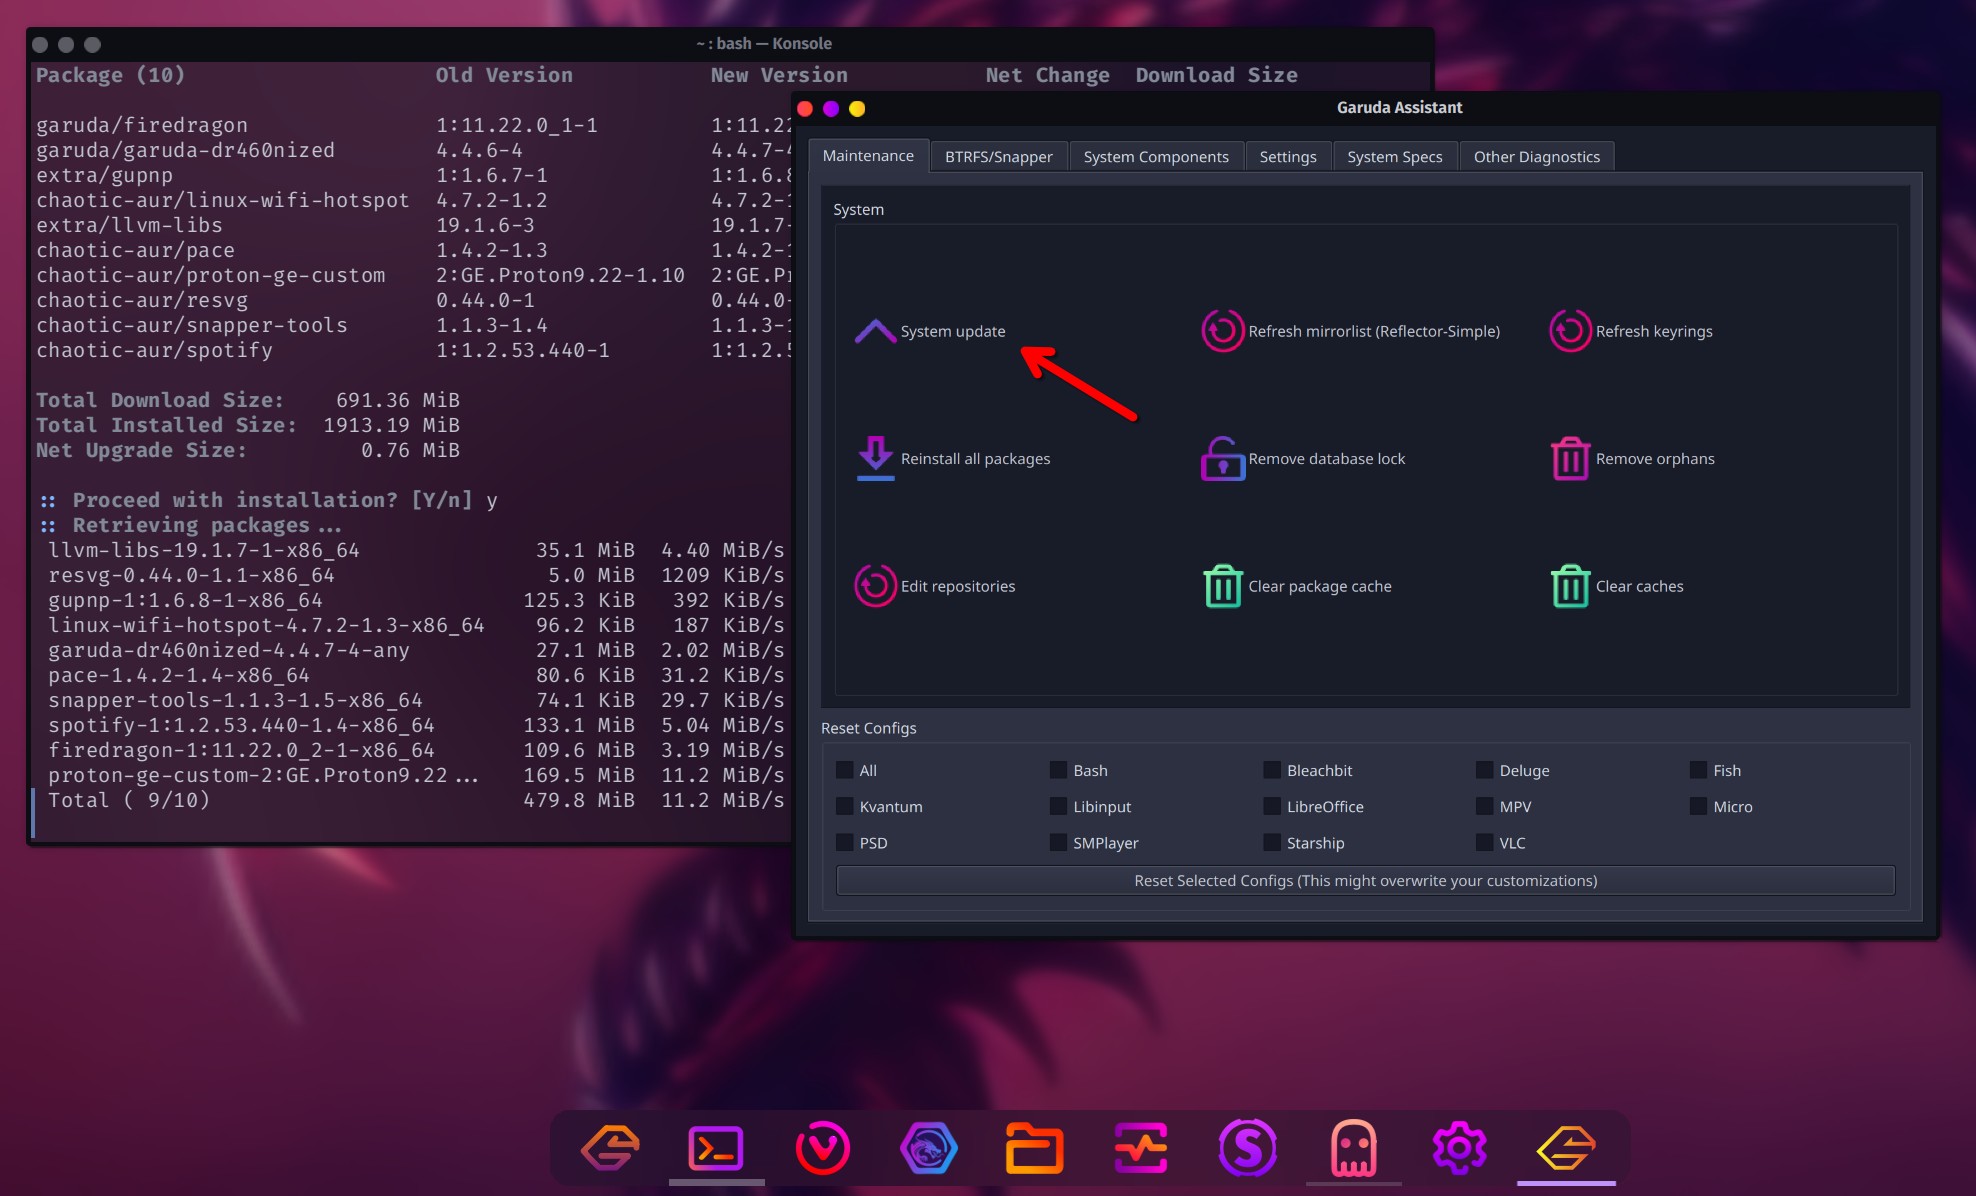
It’s important to update your operating system and all its pre-installed software, dependencies, drivers, and so on. To make sure that our system works at its highest performance and as smooth as it gets, it’s crucial to have the latest version installed. Launch the “Garuda Welcome“, click on the “Garuda Assistant“, and click on “System Update“. You’ll be asked to add your password in the terminal and hit Enter to continue, and at some point, you’ll be asked to say ‘Yes’ or ‘No’ for the update to continue, just write
yin the terminal and hit Enter. -
Configure your display’s settings and change the refresh rate
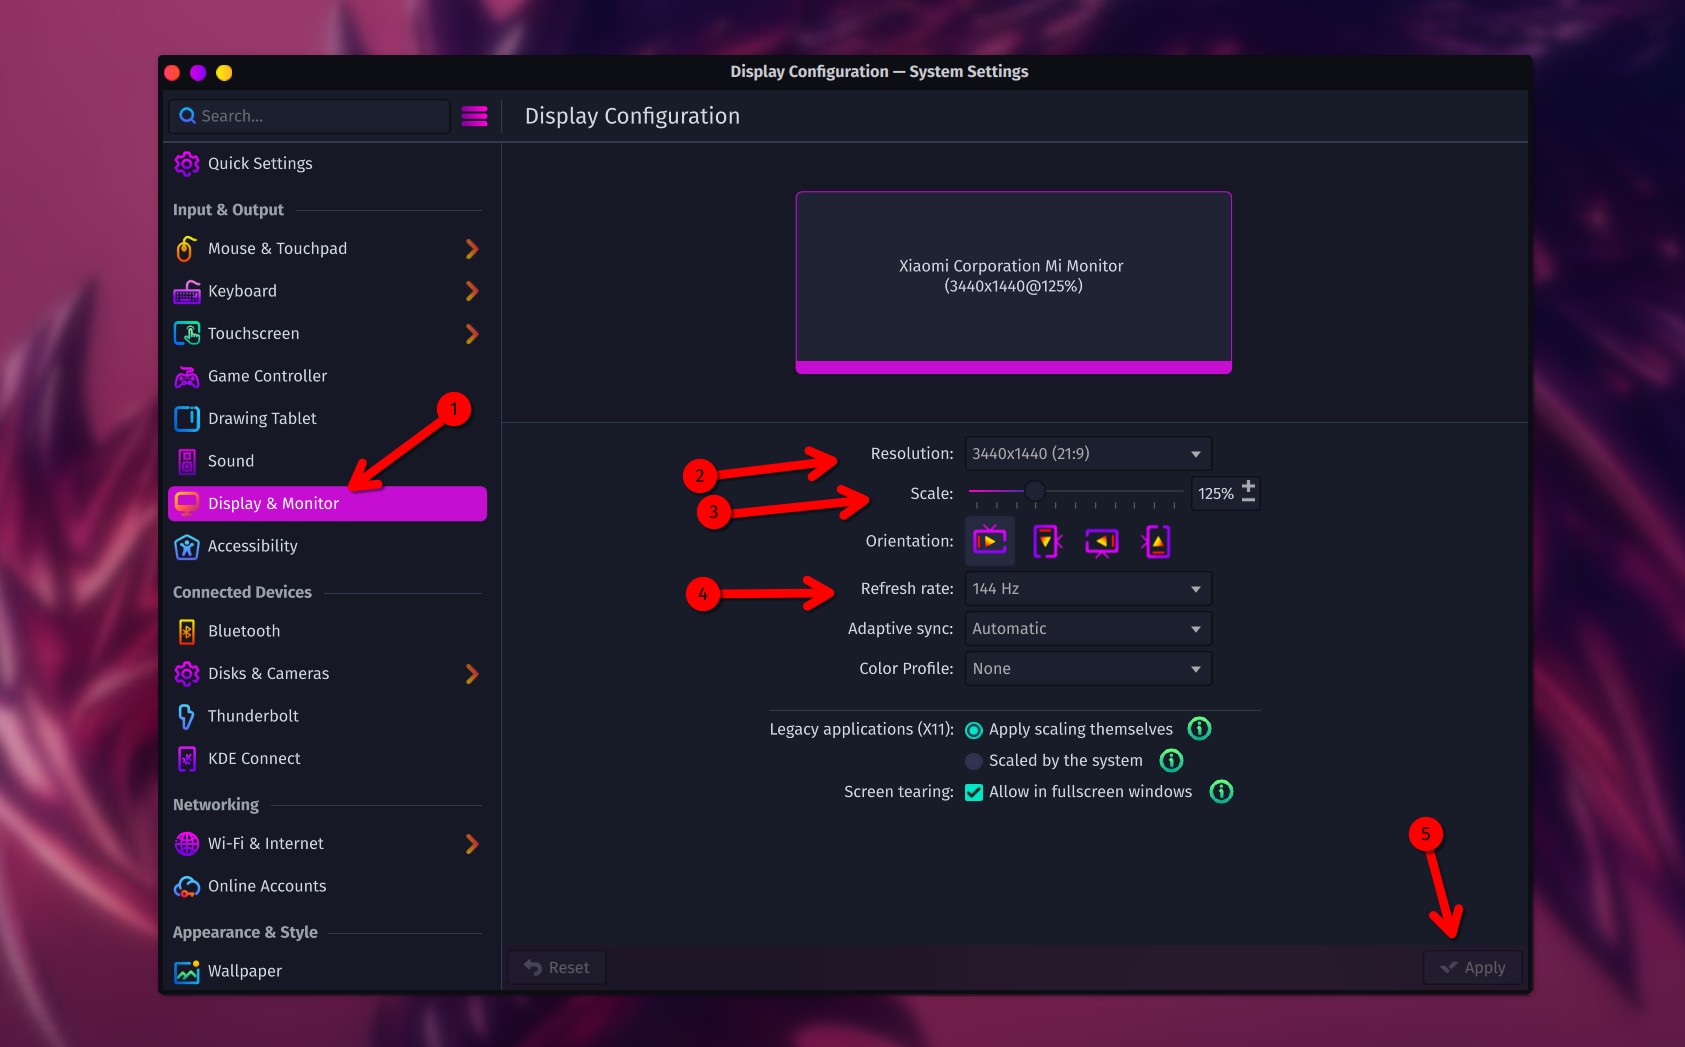
Whether you’re installing Linux or Windows, usually you’ll have to change your monitor’s ‘Refresh Rate’. Open the Garuda Settings and head over to the “Display & Monitor” tab. Make sure you’re using the highest refresh rate that your monitor and graphics card support, and change the resolution and scale settings accordingly to your needs and personal preferences. Click on “Apply” to save the changes.
-
Install the best gaming apps and software
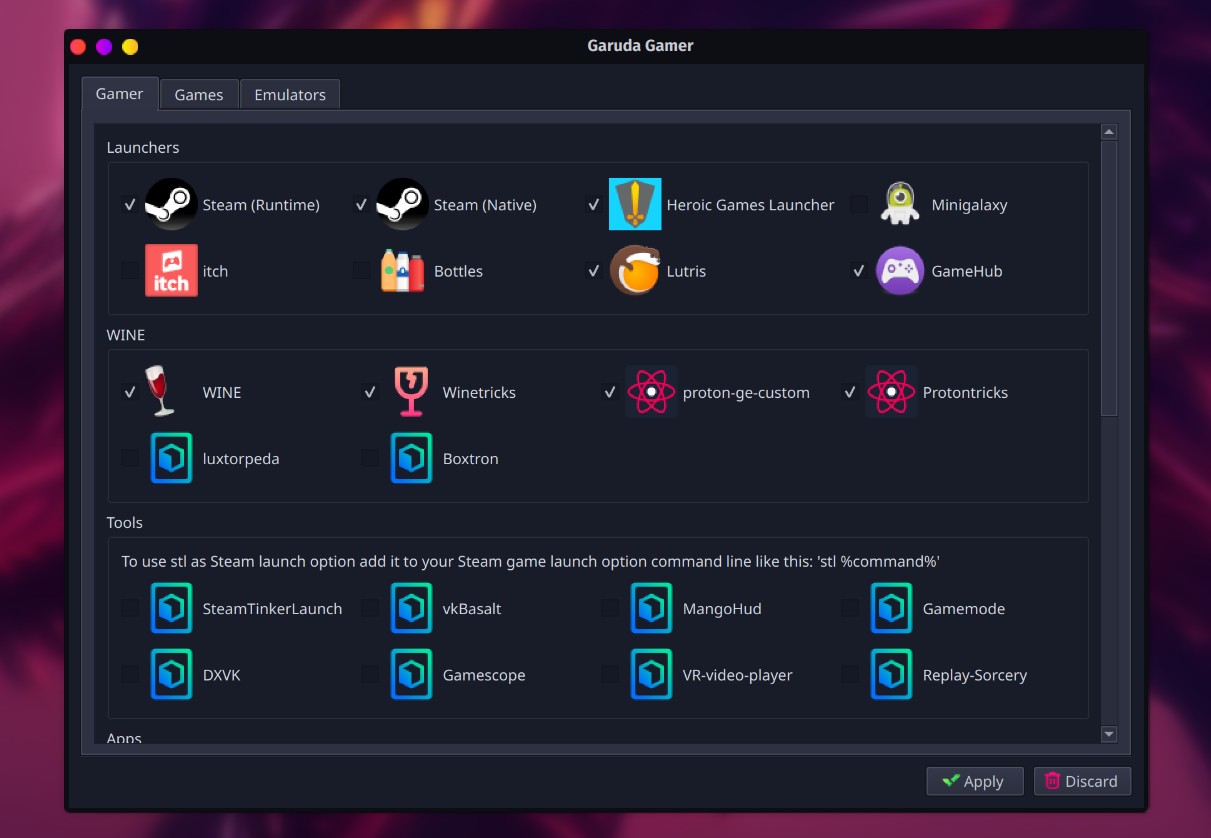
From the ‘Garuda Welcome‘ that Garuda Linux opens up each time you start your PC, click on “Gamer“. You should see a list (check the image above) with some important things that you can install as a gamer, including Steam, Heroic Games Launcher (open-source launcher for GOG, Epic Games Store, and Amazon Prime Games), Minigalaxy (a simple GOG client for Linux), Lutris(access to your Steam, Epic Games Store, GOG and Humble Bundle game libraries), WINE and Winetricks, Proton and Protontricks, and more.
Select the ones that you want to install (including WINE and Proton) and click on “Apply“.
-
Find more apps and games to install from Octopi
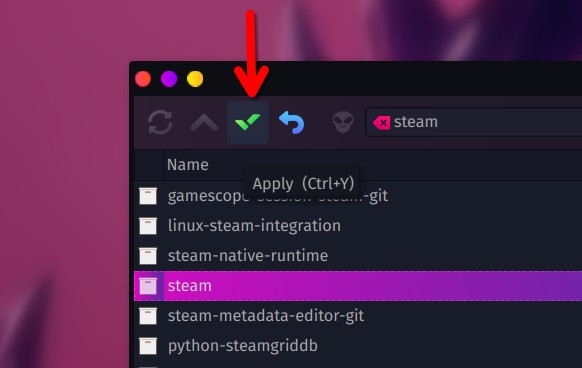
From your taskbar, launch Octopi. This is the main application that you’ll be using to find and install many popular apps, including web browsers, photo and video editors, and many of the programs that you’ve used in Windows. Simply search for any app, right-click on it, and click “Install“, and once you’ve added all the apps to the “Actions” section, click the ✔️ icon in the top left corner to install them all.
Tools:
- 1 USB device with at least 8GB of available storage.
- The latest version (in .ISO file) of any Linux Distro.
- An Internet connection to download, update, and install your apps.
4. Enable the “Steam Play” compatibility in Steam
If you downloaded and installed Steam in Linux, there’s the “Steam Play” (previously known as “Proton”) option that you’ll need to enable if you want to make most games compatible with Garuda.
To enable the Steam Play feature, follow the steps provided below:
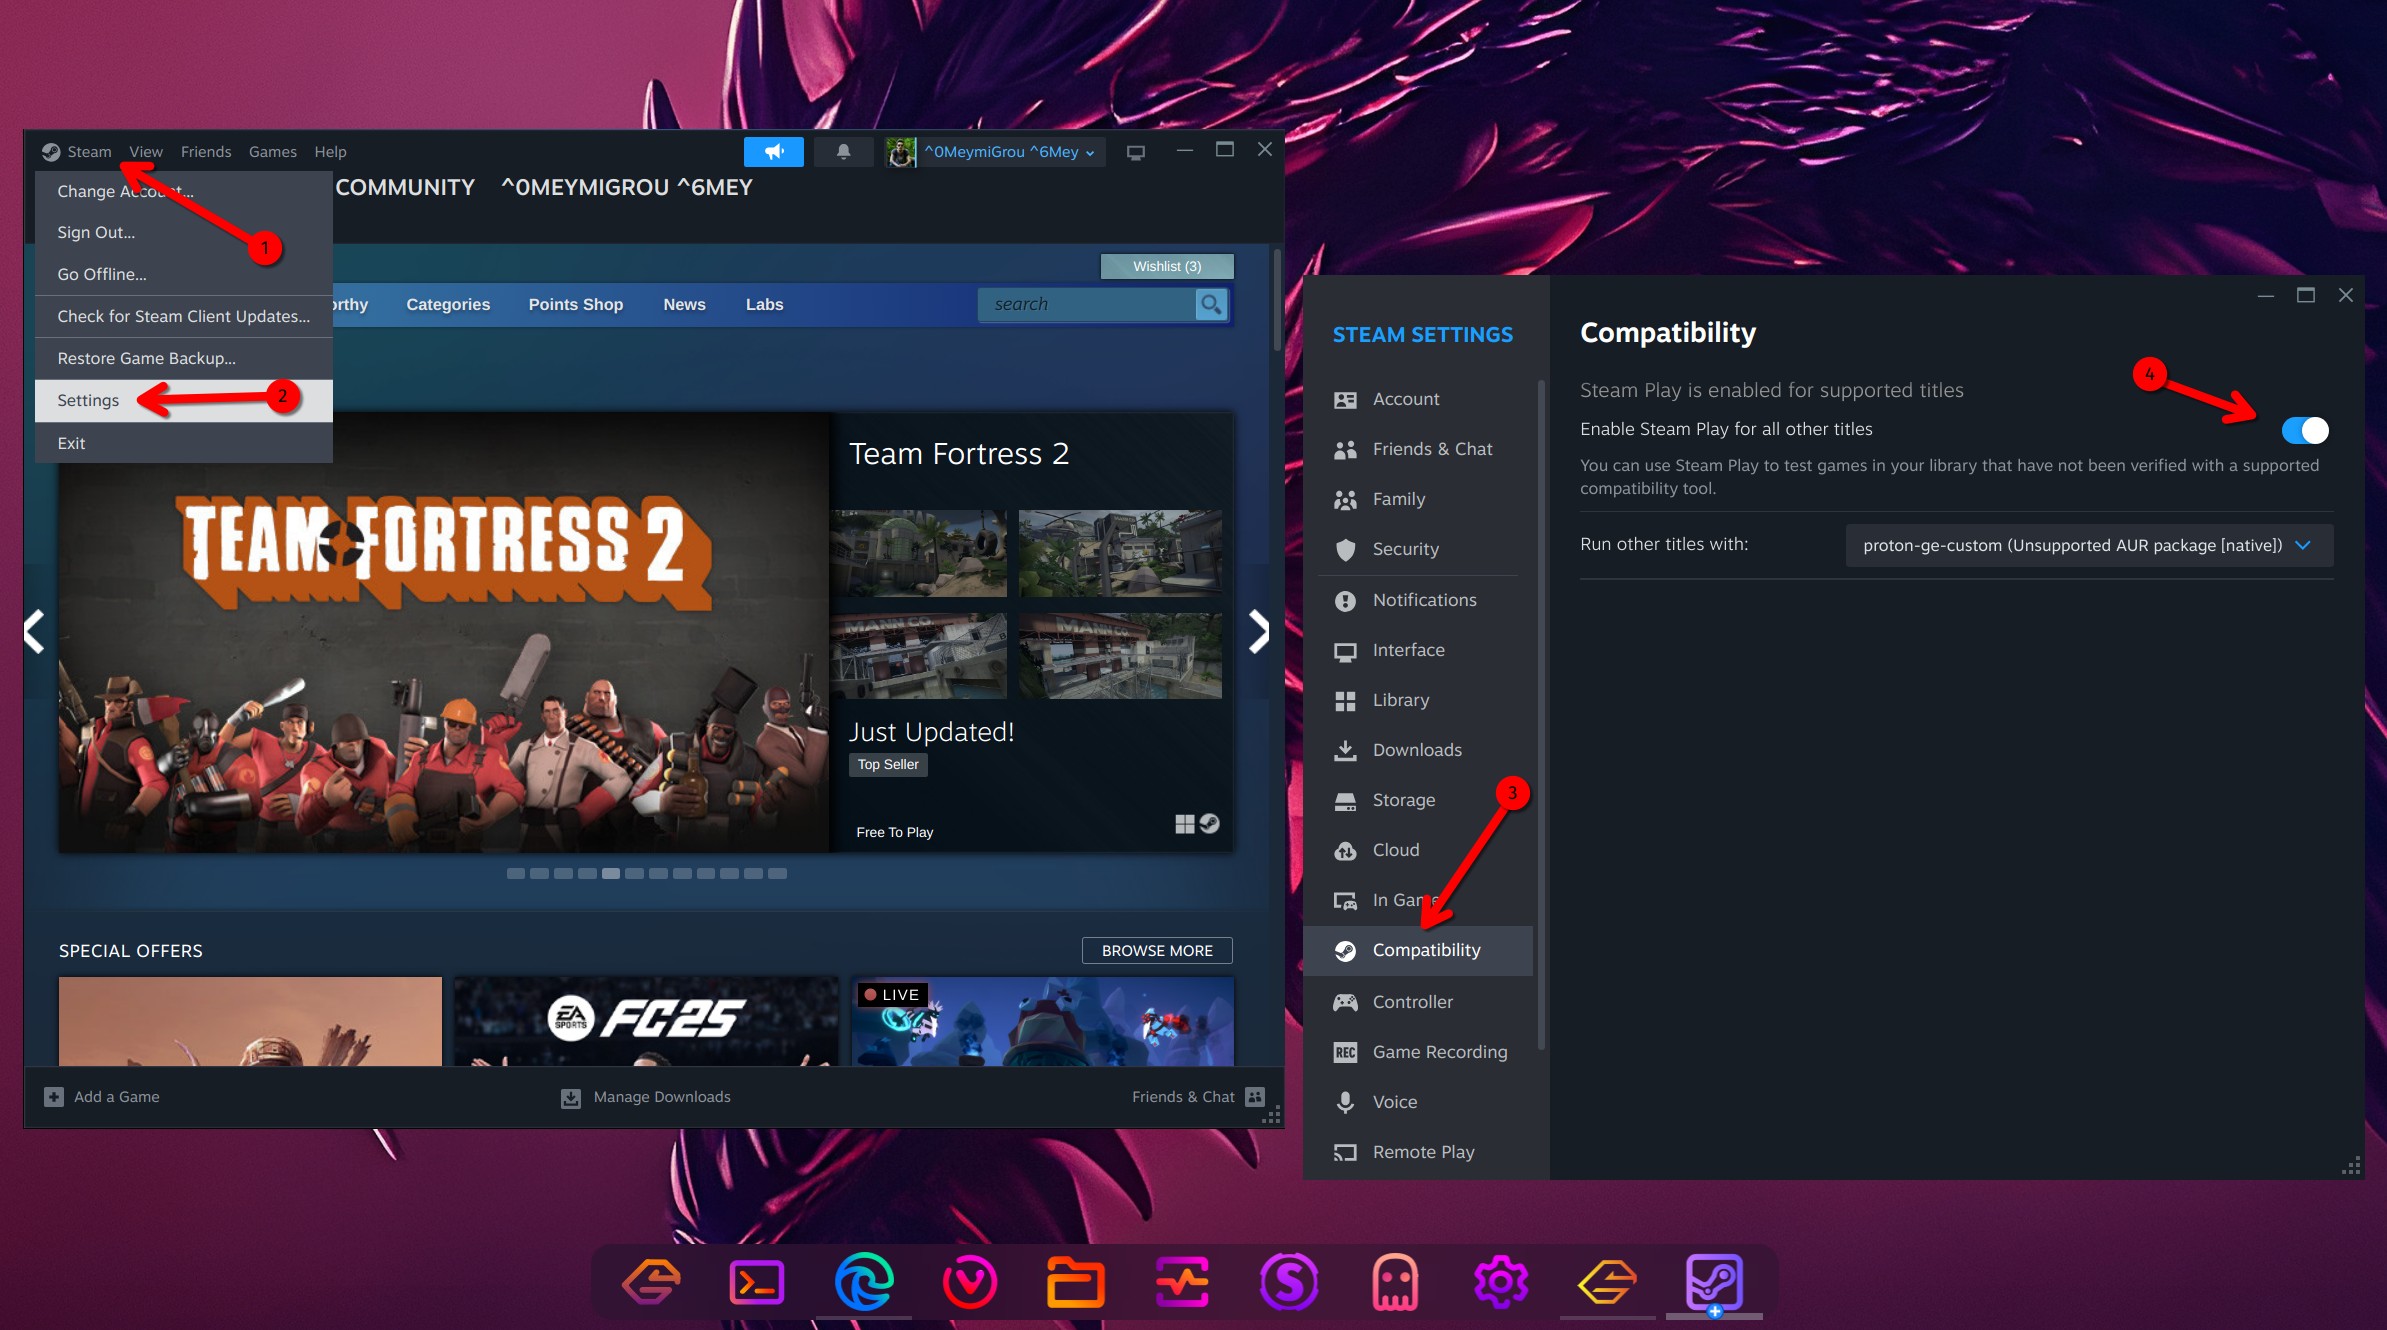
- Click on the “Steam” option in the top left corner and click on “Settings“.
- Go to the Compatibility tab.
- Enable the “Steam Play” option.
- Click on “Restart” to restart your PC so the feature can be fully enabled.
That’s it, you can now launch Steam and install your favorite games as you’ve used to do in Windows. Easy, right? You can use many other game launchers (that I have already mentioned above) to connect to more accounts, such as your Epic Games account, and install all the games that you have in your library.
5. Customize and adjust Garuda Linux according to your needs
If you installed Garuda Linux with KDE Plasma, you’d find many options to customize your graphical environment, including changing its themes, icons, wallpapers, cursor styles, window decorations, and so much more.
To access those settings simply launch Garuda’s Settings and either go to the “Wallpapers” tab or the “Colors & Themes” tab. Here’s what it looks like:
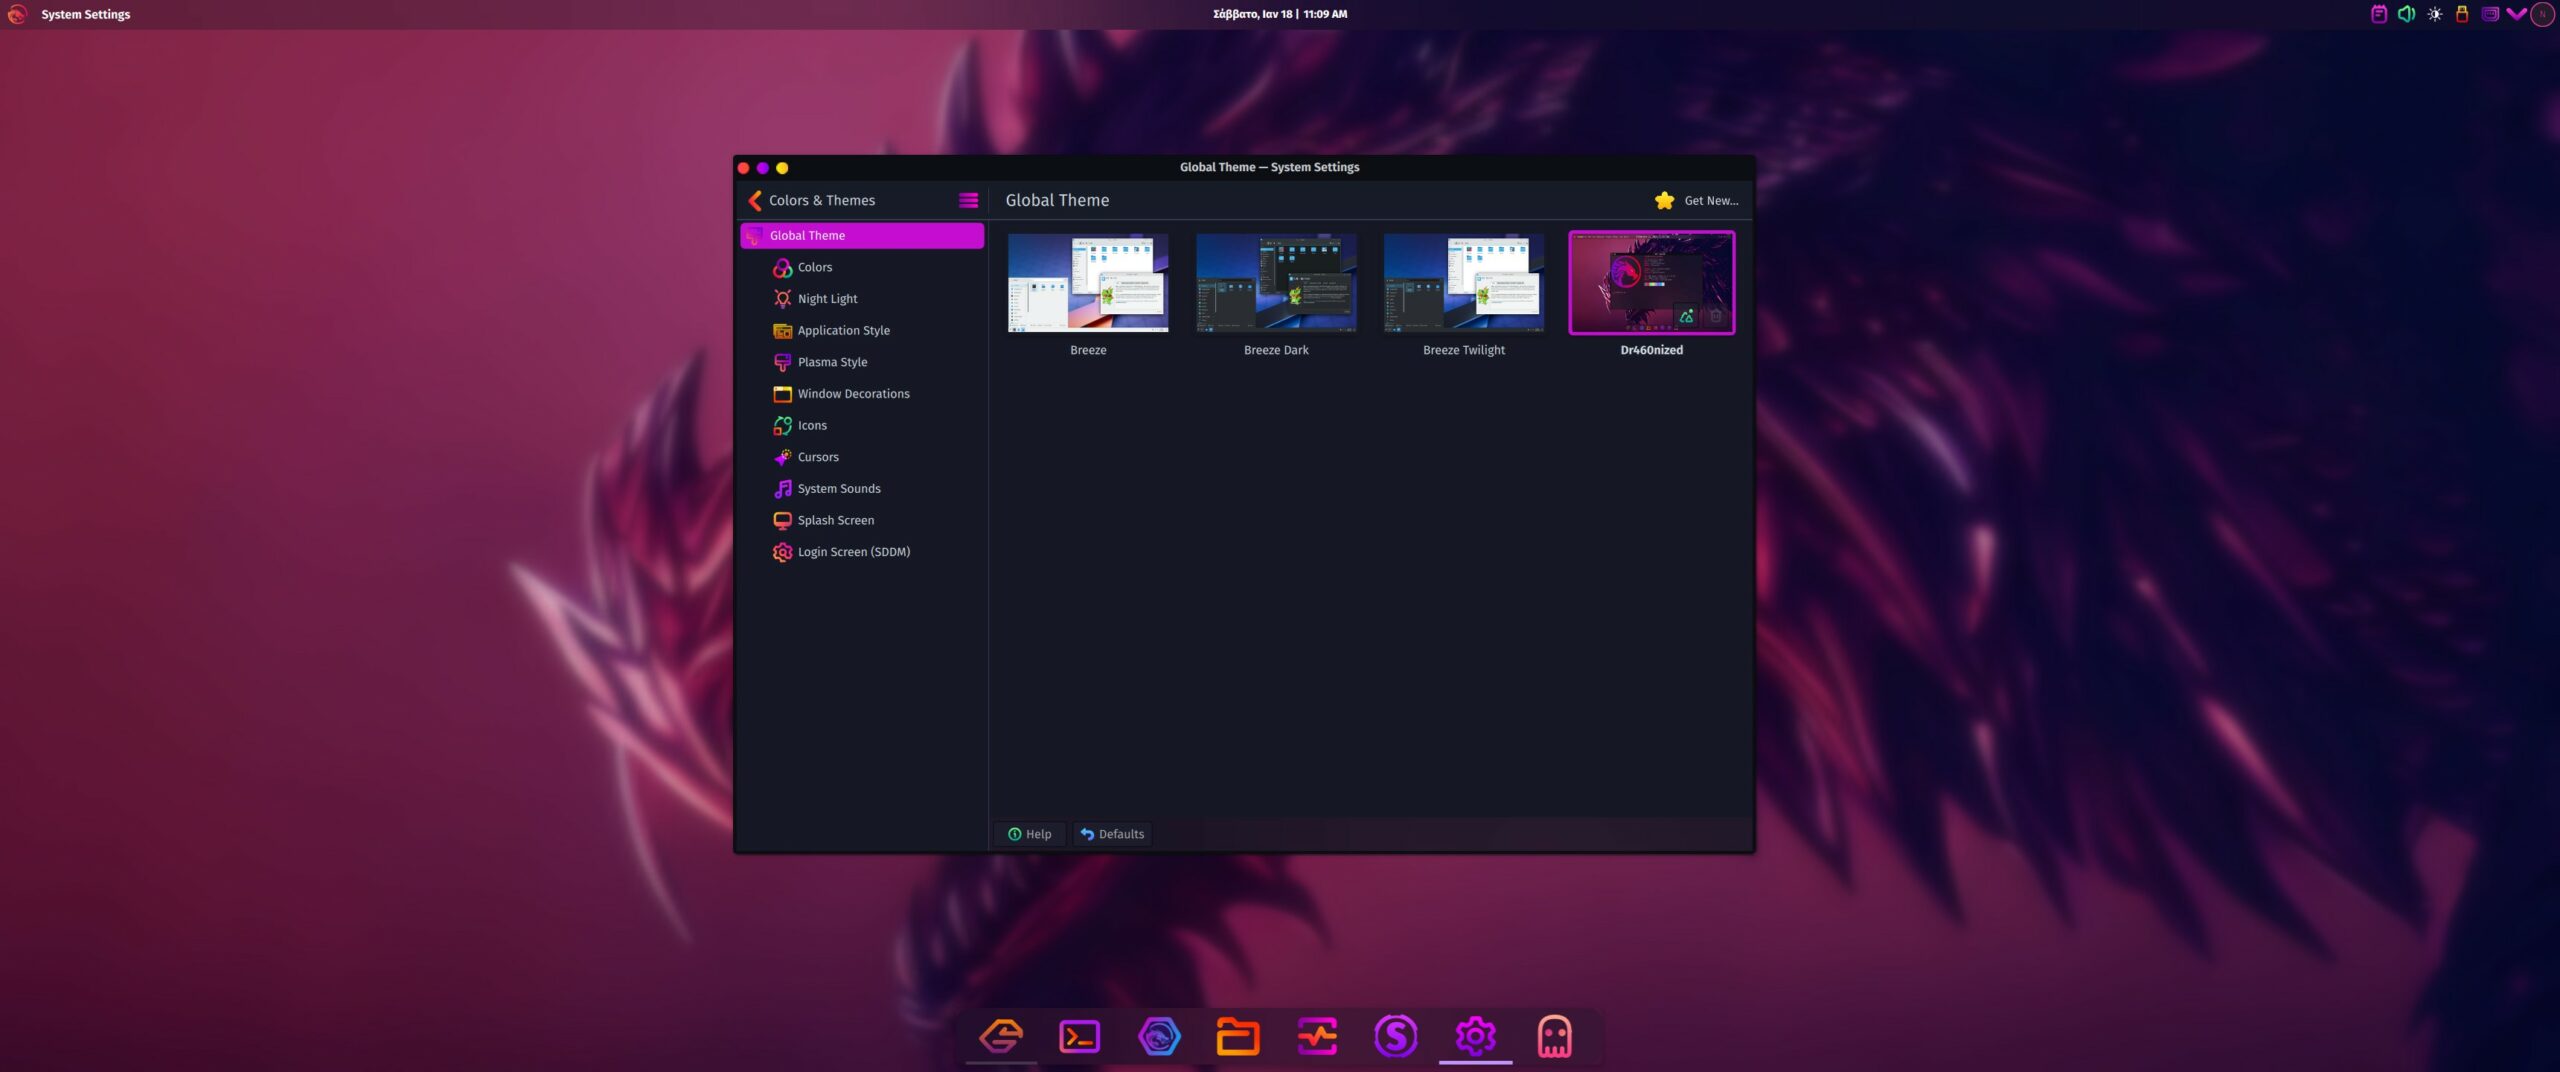
Now, Garuda Linux on its own doesn’t really include many styles, but you can easily discover and install more by clicking on the “Get New” option that you’ll find in the top right corner.
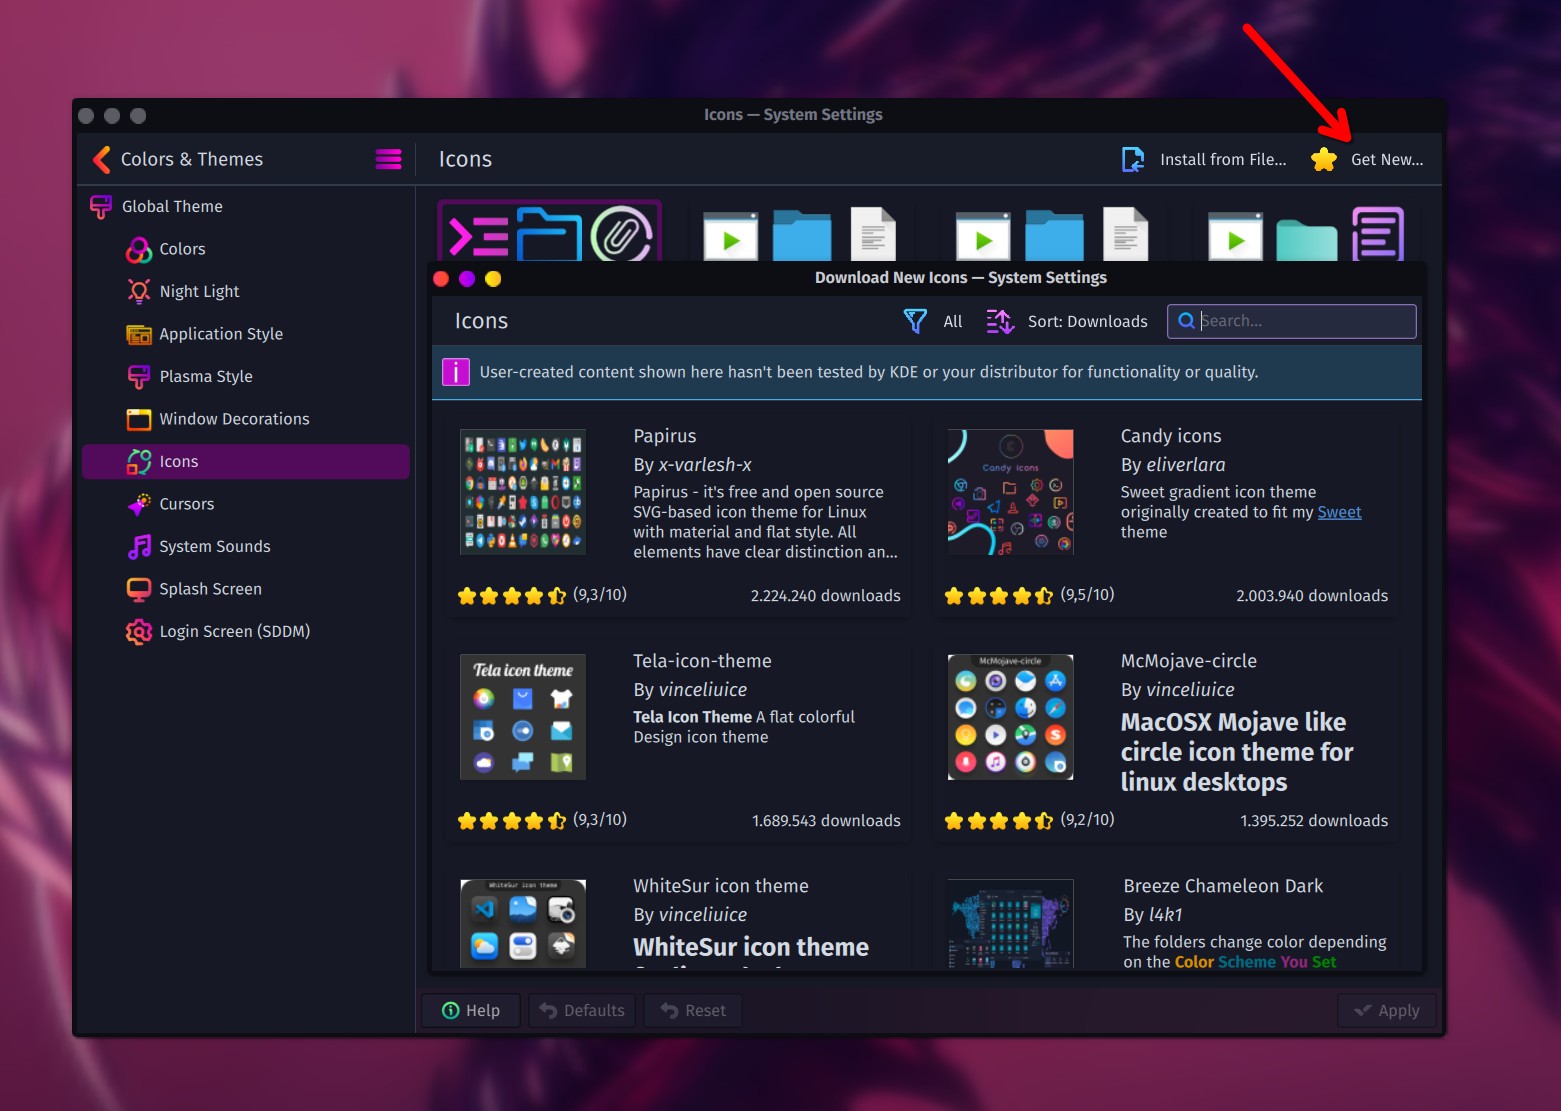
The Linux community has created thousands of different sets and styles that you can download and install with 1-click, completely for free.
Not everything will look great, and some may not even get installed if they haven’t been updated for a long time, but most of them should work just fine. To avoid getting your system bloated, make sure to uninstall whichever theme or icon set you don’t really use or need.
FAQs
If you have any questions that I haven’t mentioned below, don’t hesitate to use our comments section down below.
Should I use KDE Plasma or XFCE?
When it comes to graphical environments, some of the most popular and most common options include KDE Plasma and XFCE. Garuda Linux uses KDE Plasma as its primary graphical environment, which is fancy and comes with many customization options. But if you have a slower PC or you want full performance, XFCE is the best choice – and it can also get adjusted and customized in tons of ways.
Steam is unable to launch after installation
Once you’ve installed Steam on your Linux PC, if the application is unable to launch, simply restart your system and try again. Most of the time it will not start immediately after the installation. The same goes once you enable the Steam Play feature, which also requires a restart.
How do I keep Garuda Linux updated?
You can use the Garuda Assistant to check daily for new updates, which is crucial as most updates contain various fixes, introduce new features, and increase security. Simply launch the Garuda Welcome, click on “Garuda Assistant“, and then click on “System update“. The Terminal will launch, add your admin password, and click Enter to proceed.
My PC automatically boots to Windows and I can’t launch Garuda Linux
If you installed Garuda Linux alongside Windows but don’t see any options to select with which operating system to boot up, there are two options to boot with Garuda: The first is to restart with the “Advanced Startup” from the Windows Settings as we’ve seen earlier. The second way is to find with which keyboard key your motherboard is launching the boot menu, and when your PC starts, simply start clicking that specific key to enter into the Boot Selection Menu.
Conclusion: Setting up a gaming Linux PC in 2025 is easier than ever before
It may have taken many years of work, but nowadays there isn’t much that Linux can’t do. Most apps and games are already available for the operating system, and for the ones that aren’t, you can usually run them using WINE and Winetricks.
As you can see from the step-by-step guide, it’s a pretty easy and straightforward process, and you don’t need any experience if you follow all the steps. Installing most apps and games should be as easy as clicking on the “Install” button – the only difference is that Linux constantly asks for the admin password to execute updates and new installations for higher security.
Have you built your own Linux gaming PC? And if so, which distro have you chosen and which graphic environment have you selected to go with? Did you face any problems during the whole process? Let me know in the comments down below.

